Social Sign In with Azure

Since Oracle Application Express (APEX) version 18.1, application developers are able to easily integrate OAuth2-based authentication using many popular identity providers including Google, Facebook and Microsoft. Morten Braten, Anton Nielsen and I have previously written on this subject.
- APEX Authentication with Microsoft account
- Oracle APEX Social Sign-On with Microsoft Azure
- Oracle APEX Less Social Sign-On with MS Azure and Office 365
- APEX Social Sign-In Without a Wallet
Starting May 2019, Microsoft is changing how developers manage their OAuth2 application registrations.
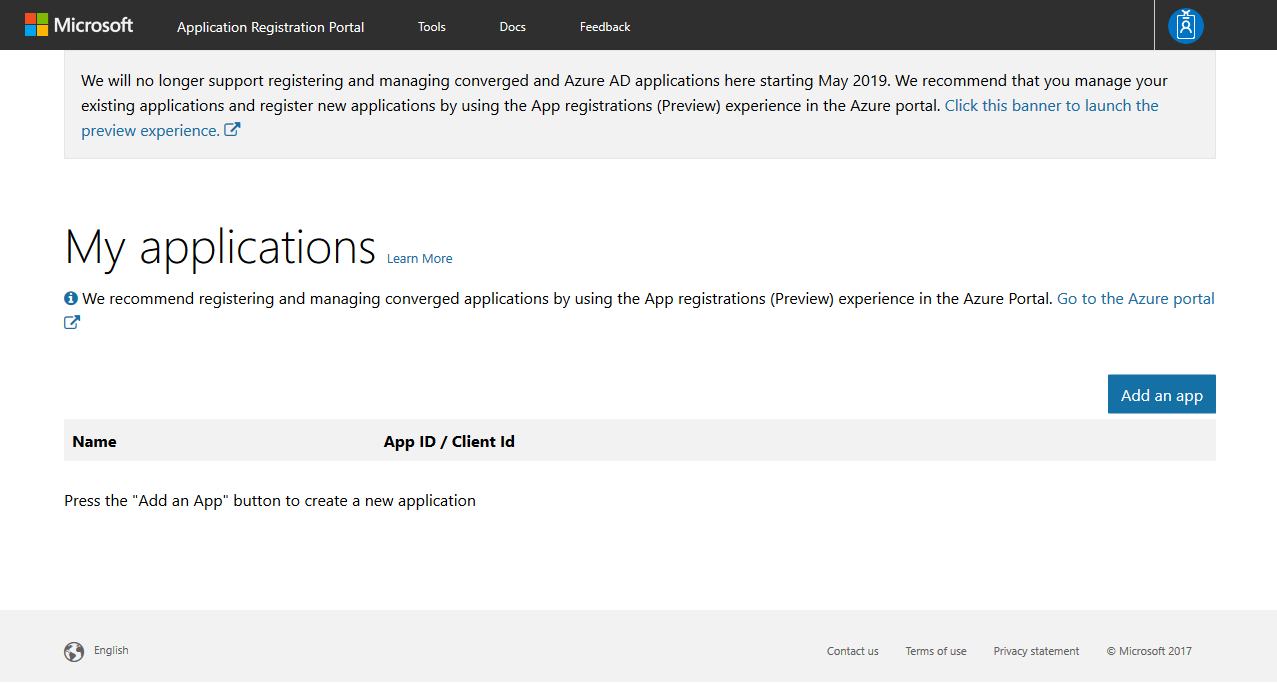
Currently, developers manage these entries using Microsoft's Application Registration Portal (https://apps.dev.microsoft.com/). This is being phased out. Going forward, application registrations will be managed via the Azure portal (https://portal.azure.com). While currently in preview, it is functional and remains rather straightforward to manage.
Before we begin, make sure that the database is configured with the appropriate network privileges and the APEX instance is configured to use an Oracle Wallet containing all the necessary SSL/TLS certificates. Please read this previous article if you need some guidance.
-
Sign in to Azure
-
Click Azure Active Directory App registrations (Preview)
-
Click New registration
-
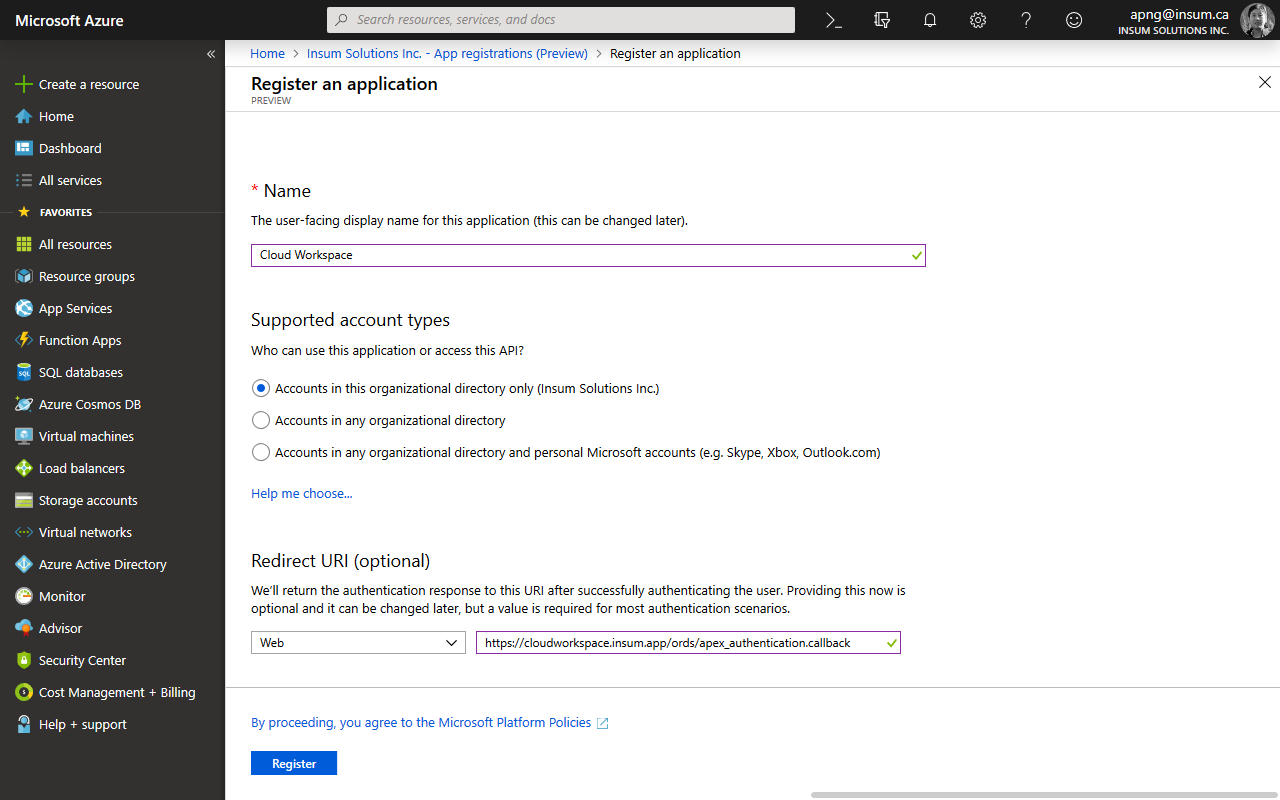
Enter a name for the app registration
-
For supported types, choose between the three options:
- Accounts in this organizational directory only (<COMPANY_NAME>)*
- Accounts in any organizational directory
- Accounts in any organizational directory and personal Microsoft accounts (e.g. Skype, Xbox, Outlook.com)
The list above is ordered in increasing accessibility but decreasing security. Microsoft provides the following descriptions for each option:
Accounts in this organizational directory only (<COMPANY_NAME>)
All user and guest accounts in your directory can use your application or API.
Use this option if your target audience is internal to your organization.
Accounts in any organizational directory
All users and guests with a work or school account from Microsoft can use your application or API. This includes schools and businesses that use Office 365.
Use this option if your target audience is business or educational customers.
Accounts in any organizational directory and personal Microsoft accounts (e.g. Skype, Xbox, Outlook.com)
All users with a work or school, or personal Microsoft account can use your application or API. It includes schools and businesses that use Office 365 as well as personal accounts that are used to sign in to services like Xbox and Skype.
Use this option to target the widest set of Microsoft identities.
* The first option is only available to Azure AD subscribers. Business accounts should have access to this feature.
-
Enter the APEX callback URL as a Web Redirect URI, e.g. https://apex.oracle.com/pls/apex/apex_authentication.callback
-
Read the policy and click Register to proceed.
-
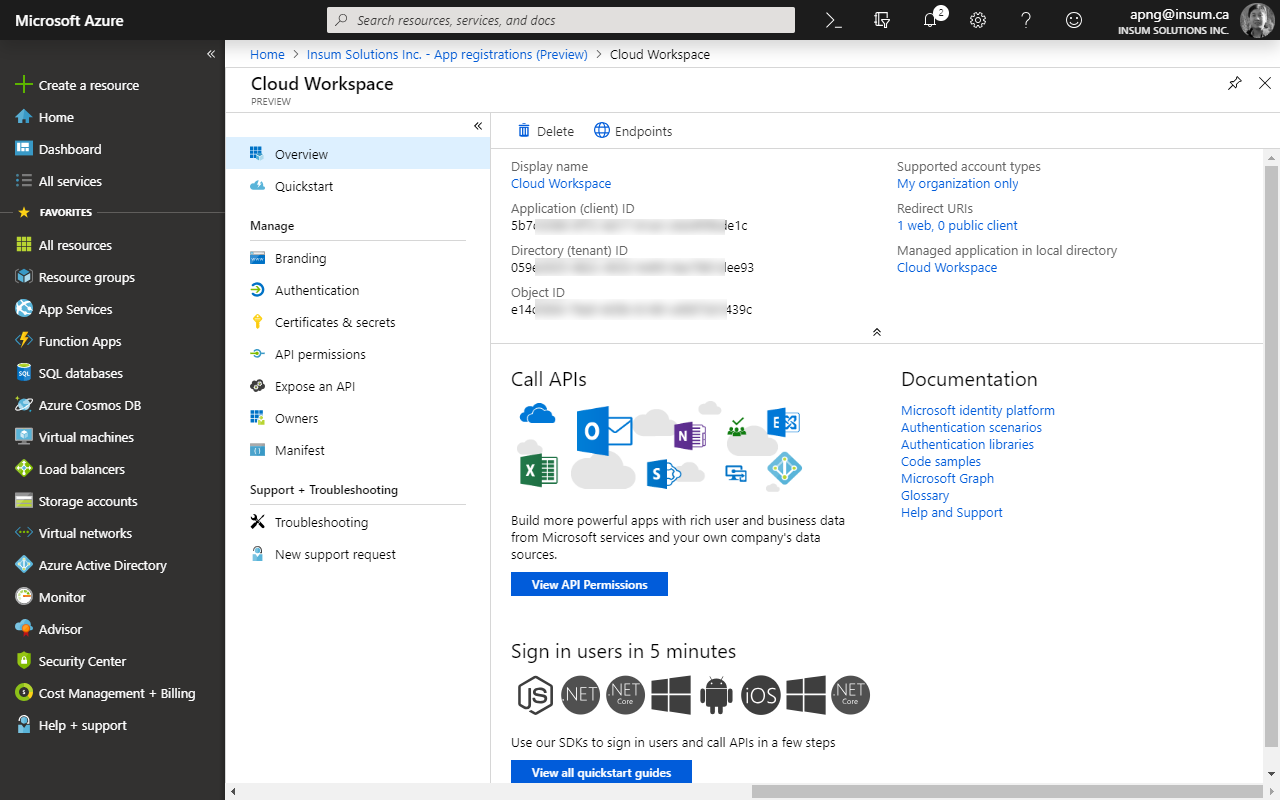
Once the app registration is completed, note the Application (client) ID on the Overview page. For Azure Active Directory (AD) subscribers (e.g. Azure AD for Office 365), also note the Directory ID.
-
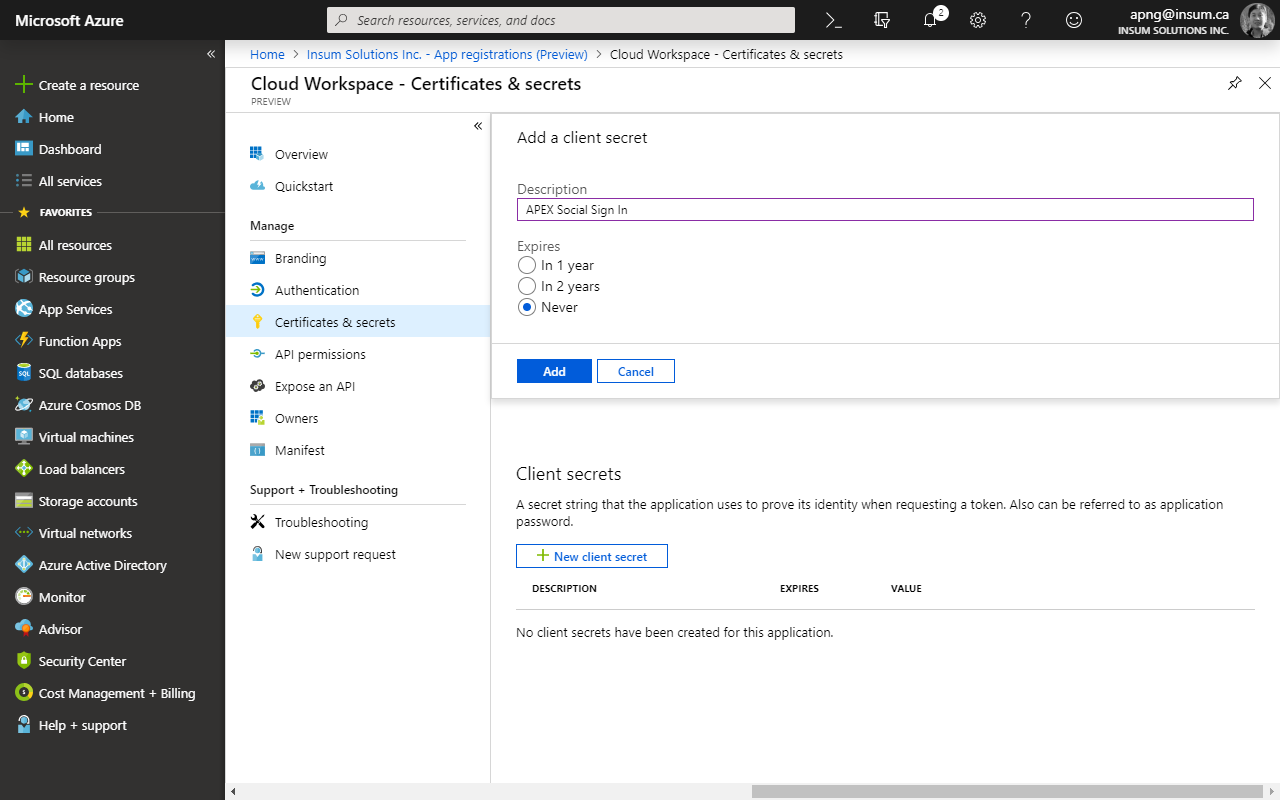
Click Certificates & secrets and then the New client secret button under the section Client secrets.
-
Provide a description and expiration period. Click Add and copy the secret value as it will be displayed only once.
-
The required API permissions should have been already added, if not, ensure that the app has at least User.Read on the Microsoft Graph API.
-
In APEX App Builder, create a Web Credential using the values for the client ID and secret pair generated earlier in the Azure portal.
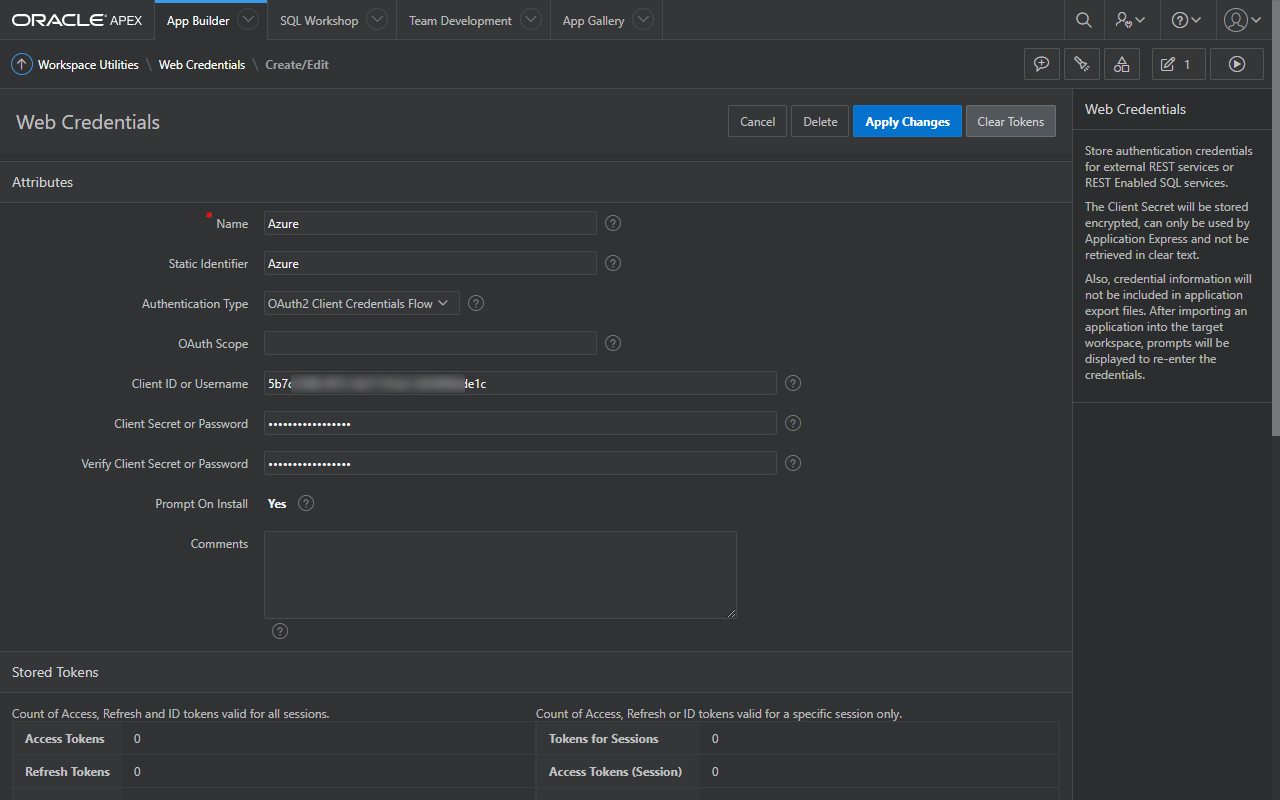
-
Create an Authentication Scheme with the following values:
| Parameter | Value |
|---|---|
| Credential Store | Select the credential store containing the client ID and secret from Azure |
| Authentication Provider | Generic OAuth2 Provider |
| Authorization Endpoint URL | https://login.microsoftonline.com/common/oauth2/v2.0/authorize |
| Token Endpoint URL(Value Required) | https://login.microsoftonline.com/common/oauth2/v2.0/token |
| User Info Endpoint URL | https://graph.microsoft.com/v1.0/me |
| Scope | User.Read |
| Authentication URI Parameters | Blank |
| Username Attribute | userPrincipalName |
| Convert Username To Upper Case | Set "Yes" if necessary, otherwise leave it as "No" |
| Additional User Attributes | Leave blank unless required |
- For the Authorization and Token endpoint URLs, replace
commonwith the Directory ID.- Authorization Endpoint URL -
https://login.microsoftonline.com/<DIRECTORY_ID>/oauth2/v2.0/authorize - Token Endpoint URL -
https://login.microsoftonline.com/<DIRECTORY_ID>/oauth2/v2.0/token
- Authorization Endpoint URL -
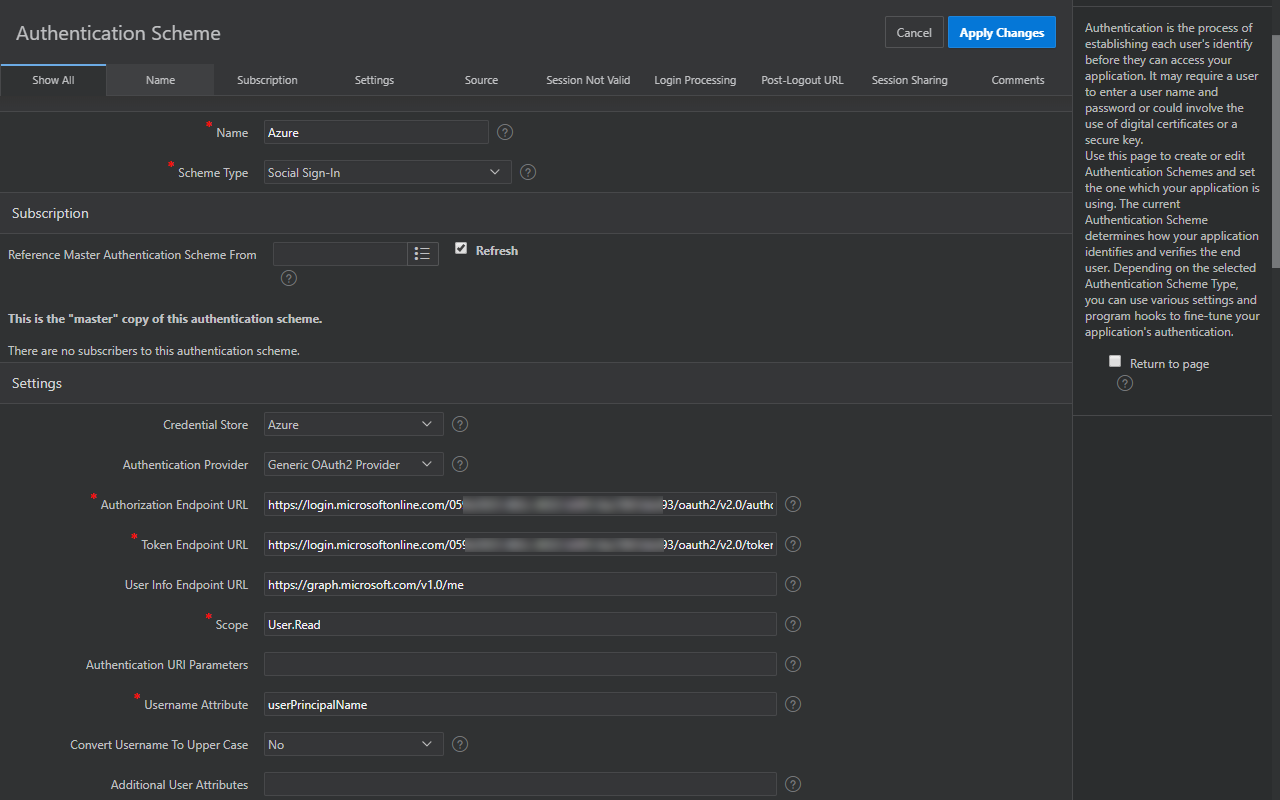
- In the Authentication Scheme's Post-Logout URL, set the value to https://login.microsoftonline.com/common/oauth2/logout, if Single Sign Out is required.
OpenID Connect
Updated on 2019-04-24
With much thanks to Jean-Marc (see comments below), please note that with the Microsoft identity platform, developers can also use the OpenID Connect to create the Authentication scheme. Unlike the older OpenID v1.0 and v2.0 specifications that are now obsolete, the OpenID Connect specification works on top of the OAuth2 protocol. It provides a JSON-based metadata document that provides the necessary information for the client to execute the OAuth2 authentication workflow.
From https://login.microsoftonline.com/common/v2.0/.well-known/openid-configuration:
{
    "authorization_endpoint": "https://login.microsoftonline.com/common/oauth2/v2.0/authorize",
    "token_endpoint": "https://login.microsoftonline.com/common/oauth2/v2.0/token",
    "token_endpoint_auth_methods_supported": [
        "client_secret_post",
        "private_key_jwt",
        "client_secret_basic"
],
    "jwks_uri": "https://login.microsoftonline.com/common/discovery/v2.0/keys",
    "response_modes_supported": [
        "query",
        "fragment",
        "form_post"
],
    "subject_types_supported": [
        "pairwise"
],
    "id_token_signing_alg_values_supported": [
        "RS256"
],
    "http_logout_supported": true,
    "frontchannel_logout_supported": true,
    "end_session_endpoint": "https://login.microsoftonline.com/common/oauth2/v2.0/logout",
    "response_types_supported": [
        "code",
        "id_token",
        "code id_token",
        "id_token token"
],
    "scopes_supported": [
        "openid",
        "profile",
        "email",
        "offline_access"
],
    "issuer": "https://login.microsoftonline.com/{tenantid}/v2.0",
    "claims_supported": [
        "sub",
        "iss",
        "cloud_instance_name",
        "cloud_instance_host_name",
        "cloud_graph_host_name",
        "msgraph_host",
        "aud",
        "exp",
        "iat",
        "auth_time",
        "acr",
        "nonce",
        "preferred_username",
        "name",
        "tid",
        "ver",
        "at_hash",
        "c_hash",
        "email"
],
    "request_uri_parameter_supported": false,
    "userinfo_endpoint": "https://graph.microsoft.com/oidc/userinfo",
    "tenant_region_scope": null,
    "cloud_instance_name": "microsoftonline.com",
    "cloud_graph_host_name": "graph.windows.net",
    "msgraph_host": "graph.microsoft.com",
    "rbac_url": "https://pas.windows.net"
}
Along with the necessary endpoint URLs for OAuth2 authentication, the document also indicates the scope and claims supported, which are useful for setting up your APEX Authentication Scheme.
APEX Authentication Scheme using OpenID Connect
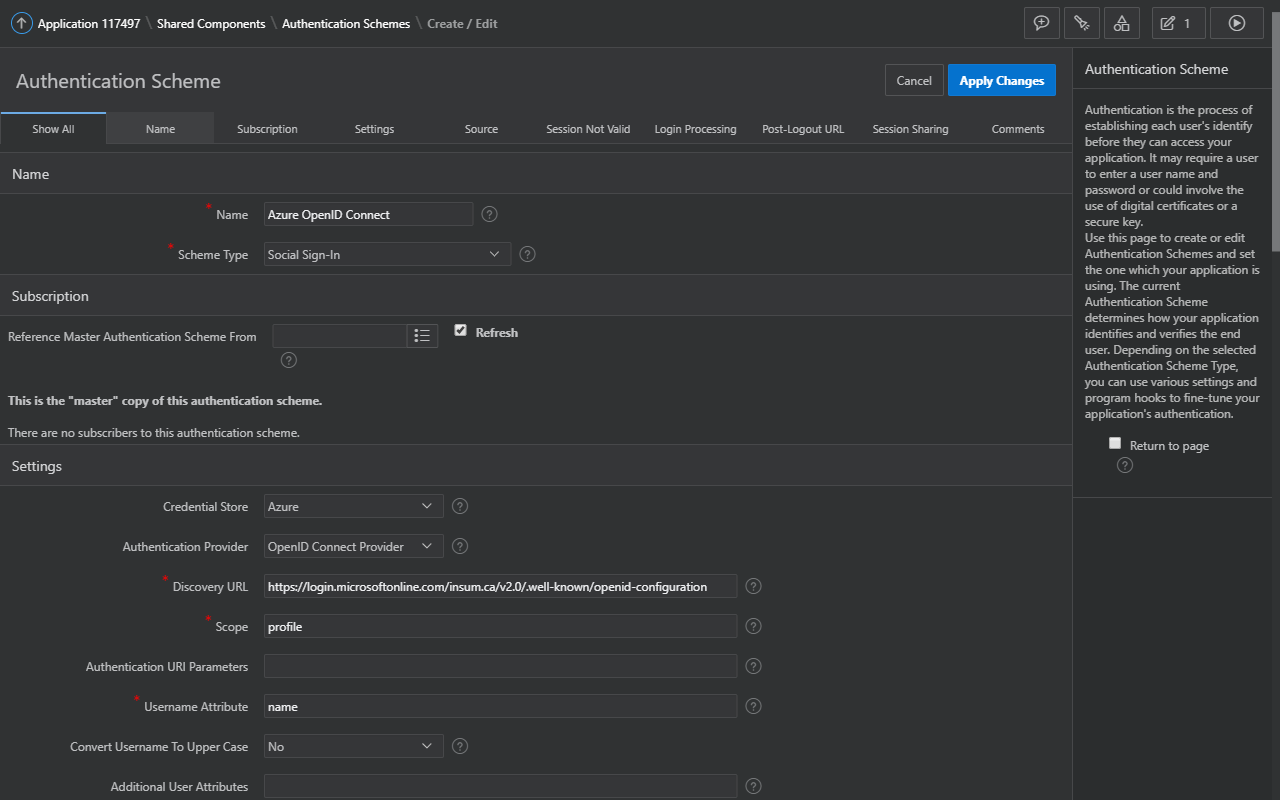
| Parameter | Value |
|---|---|
| Credential Store | Select the credential store containing the client ID and secret from Azure |
| Authentication Provider | OpenID Connect Provider |
| Discovery URL | https://login.microsoftonline.com/{tenant}/v2.0/.well-known/openid-configuration * |
| Scope | profile,email |
| Authentication URI Parameters | Blank |
| Username Attribute | |
| Convert Username To Upper Case | Set "Yes" if necessary, otherwise leave it as "No" |
| Additional User Attributes | Leave blank unless required |
* Where
{tenant}can be either of the following:
commonorganizationsconsumers- Azure AD tenant's domain name or GUID identifier (Directory ID)
That's it!
As you can see, there is very little work involved to set this up, yet the benefits are far reaching. Once implemented, be sure to get your users' feedback, and find out how much productivity has increased for them!
