APEX Social Sign-In Without a Wallet


Updated June 4, 2018
- Added settings for social sign-in with Microsoft OAuth2.
The much anticipated Oracle Application Express version 18.1 was announced on May 24, 2018. Since early this year Monty Latiolais has been posting a monthly series of blog posts on Power Ranking Oracle APEX 18.1 New Features. My personal favourite is Social Login, but unfortunately it never made it to the top, even though it should!
When 4.2 was released, I was ecstatic. The introduction of the HTTP Header Variable authentication scheme allowed me to convince my boss back then, that APEX was the way to go. One critical success factor was the ease in integrating APEX application with the wider enterprise authentication framework that has already been established. However, you typically had to have a certain system architecture to capitalize on this authentication scheme.
With the newly released Social Sign-in Authentication Scheme, just about anyone can utilize the countless social platforms that provide OAuth2 logins.
As you might expected, it didn't take long for me to upgrade my personal APEX instance that runs on top of Oracle Database 11g Express Edition (XE) that is too many years out of date now. The authentication scheme makes calls to identity providers using the APEX_WEB_SERVICE package and usually, that's over HTTPS. So yes, you will need to load up your Oracle wallets with the certificate chains. Read Carsten Czarski's excellent explanation here. You can get these from your browser as Carsten describes, or directly from the source such as DigiCert's list of Root and Intermediate Certificates. However, the deal breaker here is that there is no convenient way to do this in XE. Even if you do successfully create a wallet for XE, being so old and unpatched, it will still have difficulty negotiating with modern day certificates.
Thank goodness for reverse proxies! There are many ways to do this, but for me, I use Suez.
IMPORTANT SECURITY NOTE: Even though you can bypass SSL checks, doesn't mean that you should. End-to-end encryption is always preferred, especially when dealing with confidential information.
Google
Google and Facebook sign-ins are pre-configured for use, but if you are using a "reverse-proxied" approach, then it might not be what you want. At least for Google sign-in, here are my configurations and setup:
- Add the following to the Suez configuration:
{
    "service": {
        "port": 3001
    },
    "apiTargets": [
        {
            "name": "googleapis",
            "proxyTarget": "https://www.googleapis.com"
        }
]
}
-
Ensure that
googleapis.localhostresolves to 127.0.0.1. -
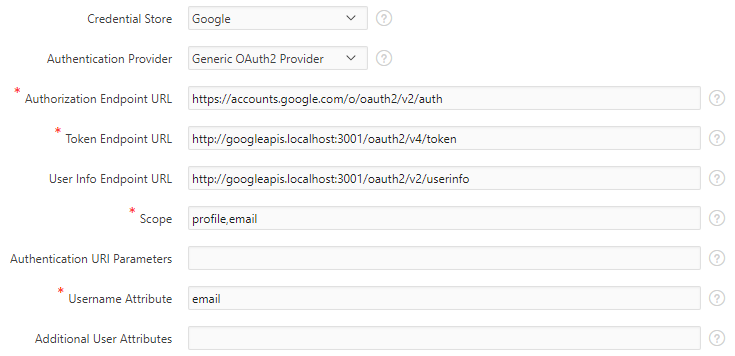
Follow my previous guide on setting up Google Sign-in. The key difference is not to use the pre-configured Google option, but instead, set up a Generic OAuth2 Provider using the following settings:
- Authorization Endpoint URL: https://accounts.google.com/o/oauth2/v2/auth
- Token Endpoint URL: http://googleapis.localhost:3001/oauth2/v4/token
- User Info Endpoint URL: http://googleapis.localhost:3001/oauth2/v2/userinfo
Microsoft
- Add the following to the Suez configuration:
{
    "service": {
        "port": 3001
    },
    "apiTargets": [
        {
      "name": "loginmicrosoftonline",
      "proxyTarget": "https://login.microsoftonline.com"
    },
    {
      "name": "graphmicrosoft",
      "proxyTarget": "https://graph.microsoft.com"
    }
]
}
-
Ensure that
loginmicrosoftonline.localhostandgraphmicrosoft.localhostresolves to 127.0.0.1. -
Go to Microsoft's Application Registration Portal. Add an application under "Converged applications".
-
Enter the application name and the following information:
- Redirect URLs:
https://my.app/ords/apex_authentication.callback - Home page URL:
https://my.app/ords/f?p=myapp - The remaining fields can be left at the defaults, but make sure that the delegated permission
User.Readhas been added under "Microsoft Graph Permissions".
- Redirect URLs:
-
Under "Application Secrets", generate a new password and note both the Application Id and Password.
-
Save the application registration information.
-
Create the web credential using the Application Id and Password obtained from the registration portal.
-
Create the authentication scheme using a Generic OAuth2 Provider with the following settings:
- Authorization Endpoint URL: https://login.microsoftonline.com/common/oauth2/v2.0/authorize
- Token Endpoint URL: http://loginmicrosoftonline.localhost:3001/common/oauth2/v2.0/token
- User Info Endpoint URL: http://graphmicrosoft.localhost:3001/v1.0/me
- Scope: User.Read
- Username Attribute: userPrincipalName
Conclusion
Once you've established what server URLs are called, this approach is easily replicated for other providers. I will update this post as I learn more.