Mail Dropped

Before I begin, I just wanted to be absolutely clear that this post has nothing to do with Apple's nifty tool for sending out large email attachments.
In my previous post, I shared an approach for creating your very own Oracle Application Express (APEX) instance on a small budget. Briefly, the solution involves using Vagrant to create a very affordable virtual machine (VM) on Linode's pool of servers and run the OXAR build script, to setup the APEX instance very quickly and painlessly.
However, all that power (and savings) comes with great responsibilty.
Without the aid of managed services, the passionate APEX developer will have to handle the day-to-day administration of the system and database. One of the common tasks required of a developer is to ensure emails can be sent from APEX appplications successfully. This not only involves understanding how to use the APIs to generate and send emails, but also knowledge on maximizing the chance that emails are delivered successfully to the intended audience and do not end up in the spam bin.
So what's involved in getting email setup on your OXAR instance?
Part One
Ensure that a suitable mail daemon is running on your server. If you used the method that I prescribed in my earlier post, then you would be running a CentOS 7 server with Postfix installed, but not running on boot. Let's be sure by executing the following command:
> sudo rpm -q postfix
If Postfix is installed, you should see an output with the full package name, e.g. postfix-2.10.1-6.el7.x86_64.
If absent, install it using yum by executing the command:
> sudo yum install -y postfix
Next, check that the service is running by executing the command:
> sudo systemctl is-active postfix
The screen output should provide some clues about whether the service has been started and/or enabled to start on boot:
active⇒ service is runninginactive⇒ service is not running but enabledunknown⇒ service is not running and not enabled
If the service is in active state, then check that it is also enabled to start on boot by executing the command:
> sudo systemctl is-enabled postfix
The system should respond with either enabled or disabled.
To enable the service to start on boot, execute:
> sudo systemctl enable postfix
To start the service:
> sudo systemctl start postfix
Next, configure Postfix if necessary. In most situations, you can use Postfix to send emails directly. If that is the case, the default configuration should generally work just fine.
Email Relay
Some developers have access to SMTP servers and might like to use them to circumvent spam-related issues. It would be prudent to assume that these servers, if exposed to remote requests, will require authentication. And because it is the Internet, using a secured network protocol to authenticate is highly recommended. If you have no problems setting up SSL/TLS support for SMTP connections, then you might not want to use Postfix at all. You can configure the SMTP host, port and credentials in the APEX Instance Administration. this is addressed in Part Two.
However, if you are unable to set up a secure connection, then consider using Postfix by configuring it as a secure relay. I will use Gmail as an example. Here's what you need to do:
- Install Cyrus SASL plain authentication package:
> sudo yum install -y cyrus-sasl-plain - Execute the command:
> sudo echo "smtp.gmail.com myaccount@gmail.com:mysecurepassword" > /etc/postfix/sasl_passwd" - Execute the next command to hash the file to protect it from prying eyes:
> sudo postmap hash:/etc/postfix/sasl_passwd - Don't leave the plain text file lying around:
> sudo rm -f /etc/postfix/sasl_passwd - Configure Postfix stored in the configuration file
/etc/postfix/main.cf. Place the following lines under the section INTERNET OR INTRANET:
smtp_sasl_auth_enable = yes
smtp_sasl_password_maps = hash:/etc/postfix/sasl_passwd
smtp_sasl_security_options = noanonymous
smtp_tls_security_level = secure
smtp_tls_mandatory_protocols = TLSv1
smtp_tls_mandatory_ciphers = high
smtp_tls_secure_cert_match = nexthop
smtp_tls_CAfile = /etc/pki/tls/certs/ca-bundle.crt
relayhost = smtp.gmail.com:587
- Restart Postfix:
> sudo systemctl restart postfix
IMPORTANT: To send emails using Gmail's SMTP servers, you may need to change your account access to allow access from less secure apps.
Attribution: The method for configuring Postfix to relay emails through Gmail was adapted from Charles Auer's post.
IPv6
If you are not prepared to deal with IPv6 configuration and issues, then you might want to also limit the network protocol that Postfix uses. Update this configuration in /etc/postfix/main.cf and then restart the service.
inet_protocols = ipv4
Part Two
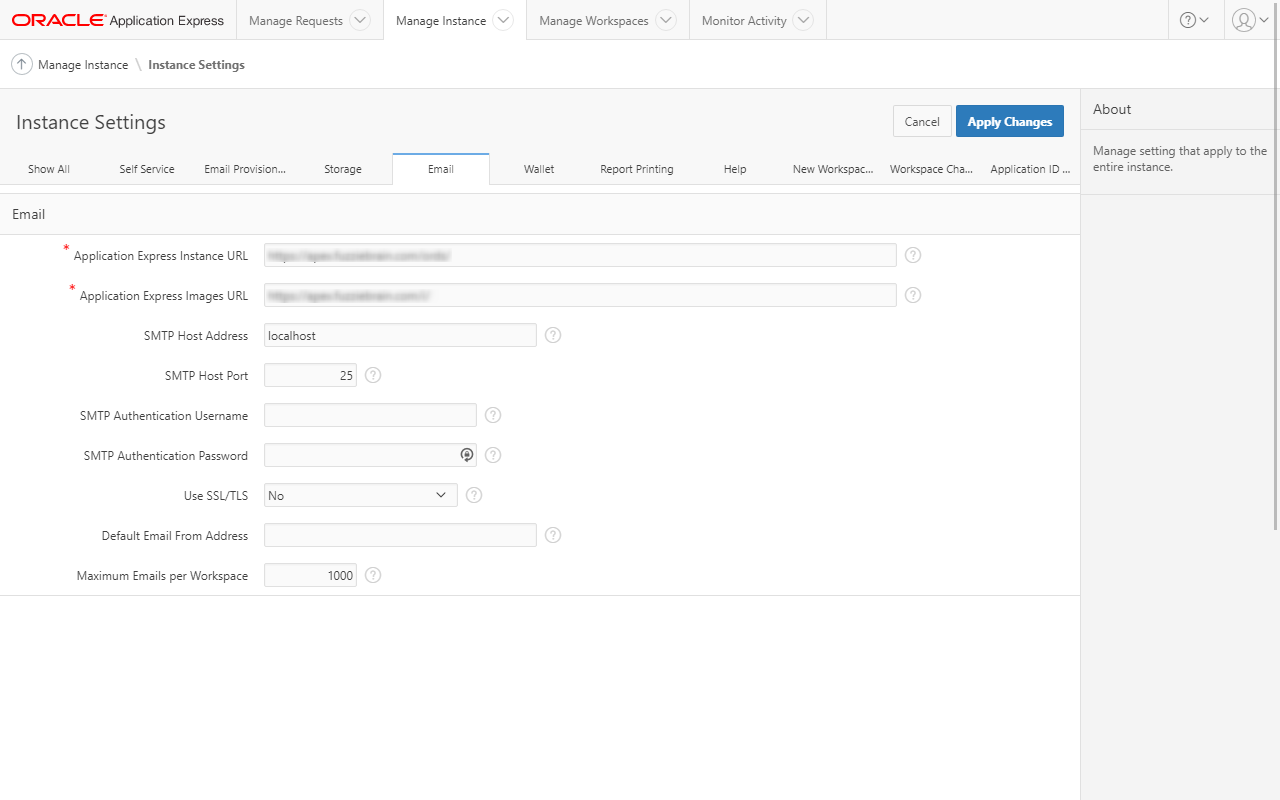
Configuring the APEX instance for email is simple. The documentation for how to do this is well documented in the docs so I will not explain at length. In a nutshell:
- Login to the Instance Administration page
- Click Manage Instance
- Click Instance Settings
- Click the Email tab
- Enter the following:
a. SMTP Host Address - set to
localhostb. SMTP Host Port - set to25or whatever port you used in the Postfix configuration - Click Apply Changes to save
- Ensure the proper network ACL has been set to allow the "APEX schema" to communicate with
localhost.
An easy way to test the service is to run the following procedure block using SQL Workshop's SQL Commands interface:
begin
apex_mail.send(
p_to => 'myfriend@email.com'
, p_from => 'me@myselfandi.com'
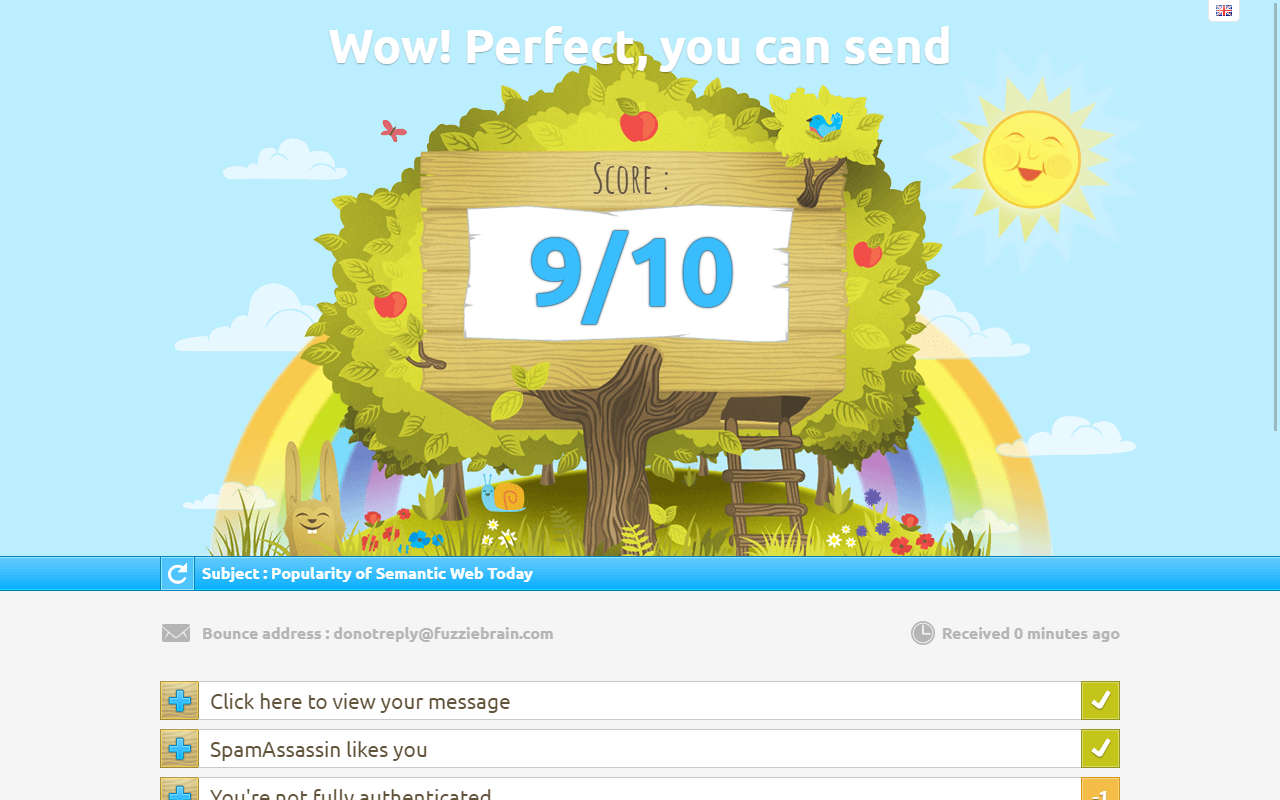
, p_subj => 'Popularity of Semantic Web Today'
, p_body => q'[
The 2017 Gartner Hype Cycle indicates that Semantic Web-related
technologies are heading past the trough of disillusionment.
We should investigate.
]'
, p_body_html => q'[
<p>
The 2017 Gartner Hype Cycle indicates that Semantic Web-related
technologies are heading past the trough of disillusionment. We
should investigate.
</p>
]'
);
apex_mail.push_queue;
end;
/
Part Three
The third and final piece that I'd like to talk about in this post is to get pass spam filters and allowing emails to arrive safely in your intended receipients' inbox.
The following are a list of checks that spam filters typically use to assess an incoming email.
- HELO Greeting Check
- Reverse DNS Check
- Sender Policy Framework (SPF)
- Domain Keys (DKIM)
- SpamAssassin content checks
- BATV (Bounce Address Tag Validation)
- Blacklisting
The easiest checks to get past is ensuring that your DNS records are correct. The HELO greeting simply checks that your domain has a valid forward and reverse entry. The latter might be a little harder to achieve since PTR records, reverse DNS mappings, are usually managed by the organization that issued the IP address. Most spam filters recognize this and would accept the email as long as there is one.
The single most important factor seems to be how the SPF records are set for your domain. It's not difficult for anyone to setup a SMTP server and with an appropriate email api/client, spoof a domain that he/she does not own and send out unauthorized emails. For example, if your APEX application attempts to use an @yahoo.com or @gmail.com email address sent from an unauthorized SMTP server, then these emails will likely be flagged as spam. Servers with strict policies might even outrightly reject these emails.
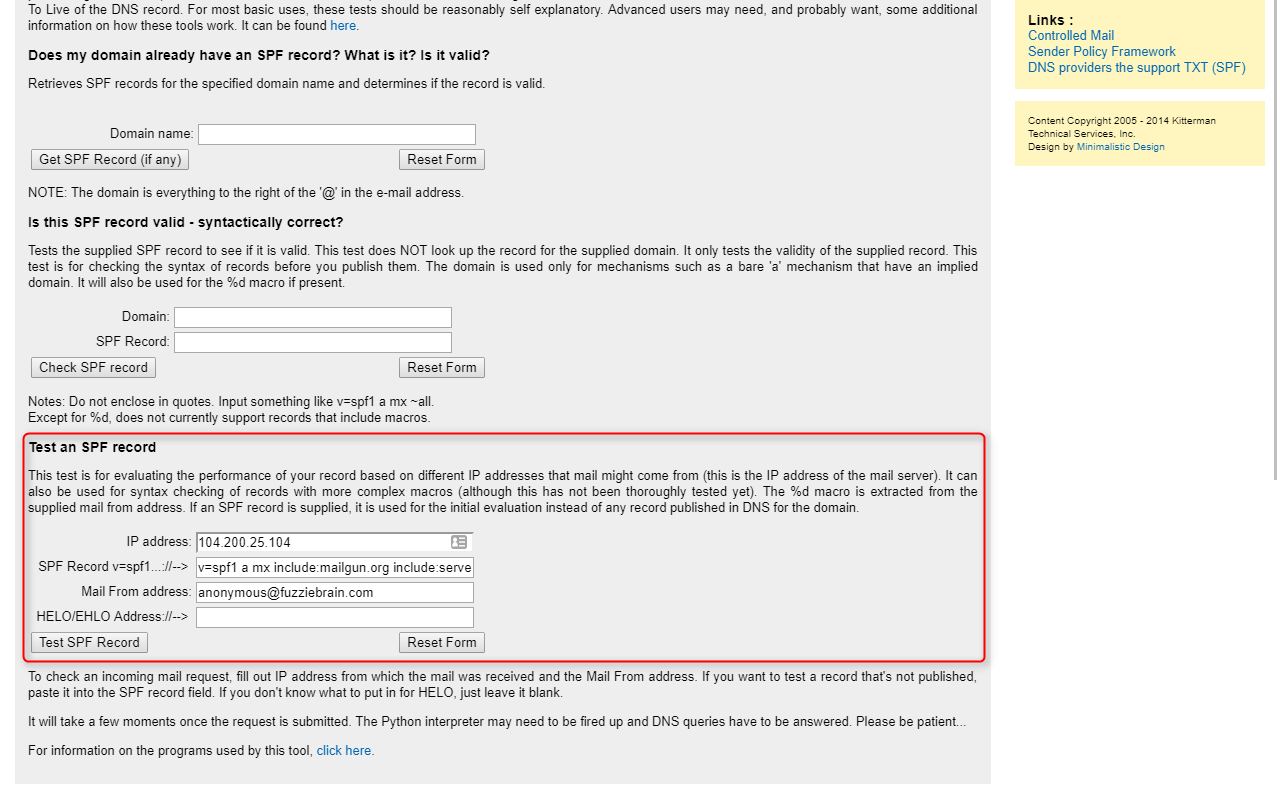
SPF is a single TXT record in the DNS that uses mechanisms to help verify if the incoming email originated from an authorized source. Commonly used mechanisms include: a, mx, include, ip4 and all. Each mechanism in the record can have one of four qualifiers (- ⇒ fail, ~ ⇒ softfail, + ⇒ pass or ? ⇒ neutral) that email filters could then use to decide on whether to flag as spam.
Below is the SPF record for the domain bcoug.org. It begins with the SPF version number and then six mechanisms. Five of them state different ways to resolve an authorized source. The last is a catch-all to state that the email source is unauthorized.
v=spf1 a mx include:_spf.google.com include:servers.mcsv.net ip4:204.244.186.184/32 ~all
Before adding a SPF record to your DNS, test it first using the tool provided by Kitterman. Add it to your DNS only when the SPF record validates successfully and can correctly identify your SMTP server as an authorized server for the specified domain.

After adding the SPF record, check to see if the record is being read correcly. You can use MxToolBox for this. Here's what the SPF record for the domain bcoug.org looks like:
| Prefix | Type | Value | PrefixDesc | Description |
|---|---|---|---|---|
| v | version | spf1 | The SPF record version | |
| + | a | Pass | Match if IP has a DNS 'A' record in given domain | |
| + | mx | Pass | Match if IP is one of the MX hosts for given domain name | |
| + | include | _spf.google.com | Pass | The specified domain is searched for an 'allow'. |
| + | include | servers.mcsv.net | Pass | The specified domain is searched for an 'allow'. |
| + | ip4 | 204.244.186.184/32 | Pass | Match if IP is in the given range |
| ~ | all | SoftFail | Always matches. It goes at the end of your record. |
NOTE: Since bcoug.org resolves to IPv4 204.244.186.184, the ip4 mechanism can be omitted.
Evaluate Your Email's Spamminess
Here's a bunch of tools I gathered from websites and stackoverflow posts that are useful for evaluating your emails (content, SPF records etc.) and creating an actionalble checklist. They have helped me quite a bit, so I'm counting on them to do the same for you!
| Link | Description |
|---|---|
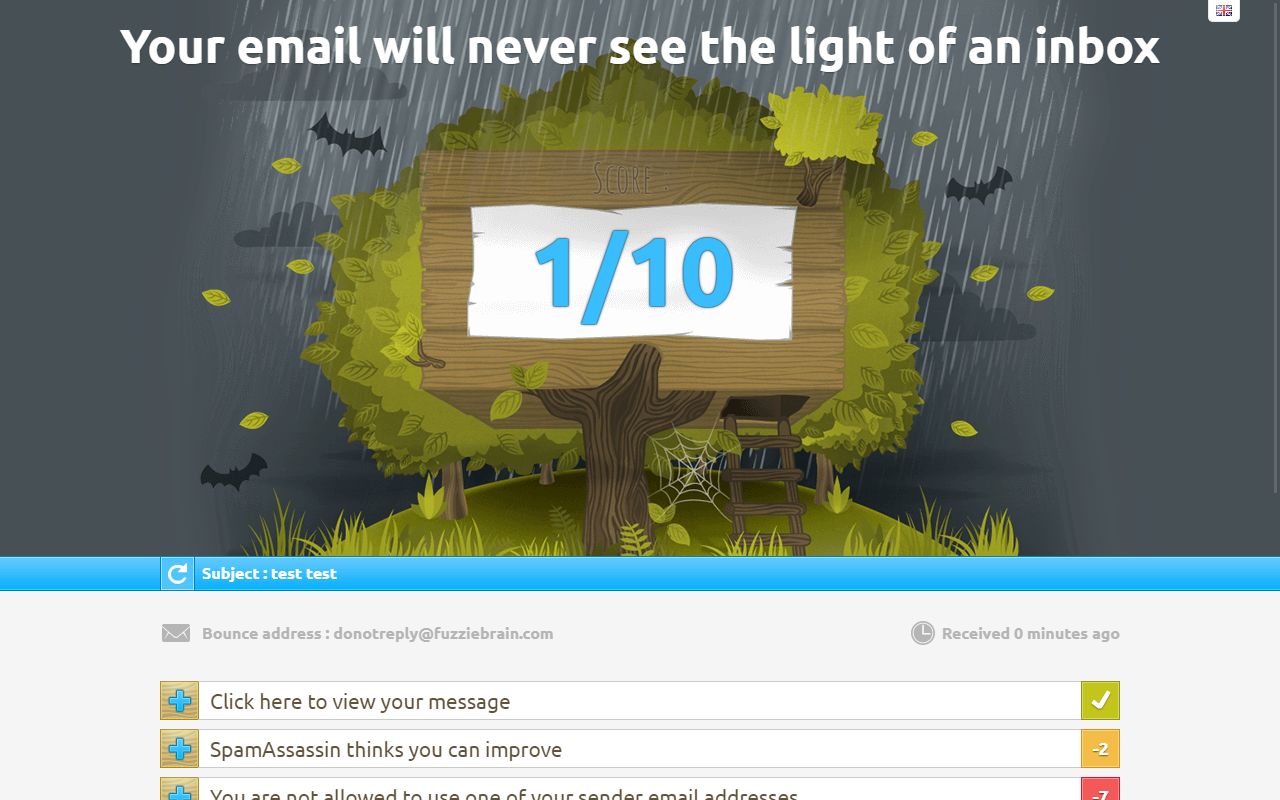
| http://www.mail-tester.com/ | Create an email and send it through your designated SMTP server. |
| http://www.allaboutspam.com/ | Like Mail Tester, send an email through your designated SMTP server. |
| http://spamcheck.postmarkapp.com/ | Copy and paste an email with its headers to get a SpamAssassin score. |
Outcome
After taking my APEX instance through cycles of corrective actions, I was finally able to achieve a score of 9/10. Where I fell short of a perfect score, is the absence of DomainKeys (DKIM) information. I have yet to implement DKIM support for my APEX instance, so stay tuned, and you can expect a follow up howto post.
Last Words
I hope this information here saves you some time figuring out what you need to do to stay out of the junk mail folder. Before I end though, here are a few more notes:
- Watch your content, even when performing checks on the validity of your emails.
- Include HTML content and make sure there are no broken links if any.
- Do your best to stay off any blacklists. It's a huge challenge getting your mail server delisted.