Say Hello From An Autonomous Database

In case you missed it, Oracle recently announced the availability of a new feature for the Autonomous Database (ADB) that allows developers and database administrators to send messages using either emails, Slack, or Microsoft Teams (Teams). At Insum, we use teams for internal communications and collaboration, and thus, you can appreciate my excitement when I heard about this feature release. Here's an early guide to getting started with DBMS_CLOUD_NOTIFICATION for those using Teams at their organisation.
Before we begin, it is worthwhile to note that for Oracle APEX, you can also send out emails and Slack/Teams using the
APEX_MAILandAPEX_WEB_SERVICEPL/SQL APIs. This is an additional convenience feature that is provided with an ADB.
Setting up DBMS_CLOUD_NOTIFICATION to send Teams messages and data requires a few preparatory steps. You may read the details here but this blog post would provide further guidance and issues I noted when working through the steps.
Create a Teams Application
The first task that you will need to complete is to create a Teams application using the Teams developer portal. Create a new application and provide the following details:
- App names
- Short name
- Descriptions
- Short description
- Long description
- Version
- Developer information
- Developer or company name
- Website
- App URLs
- Privacy policy
- Terms of use
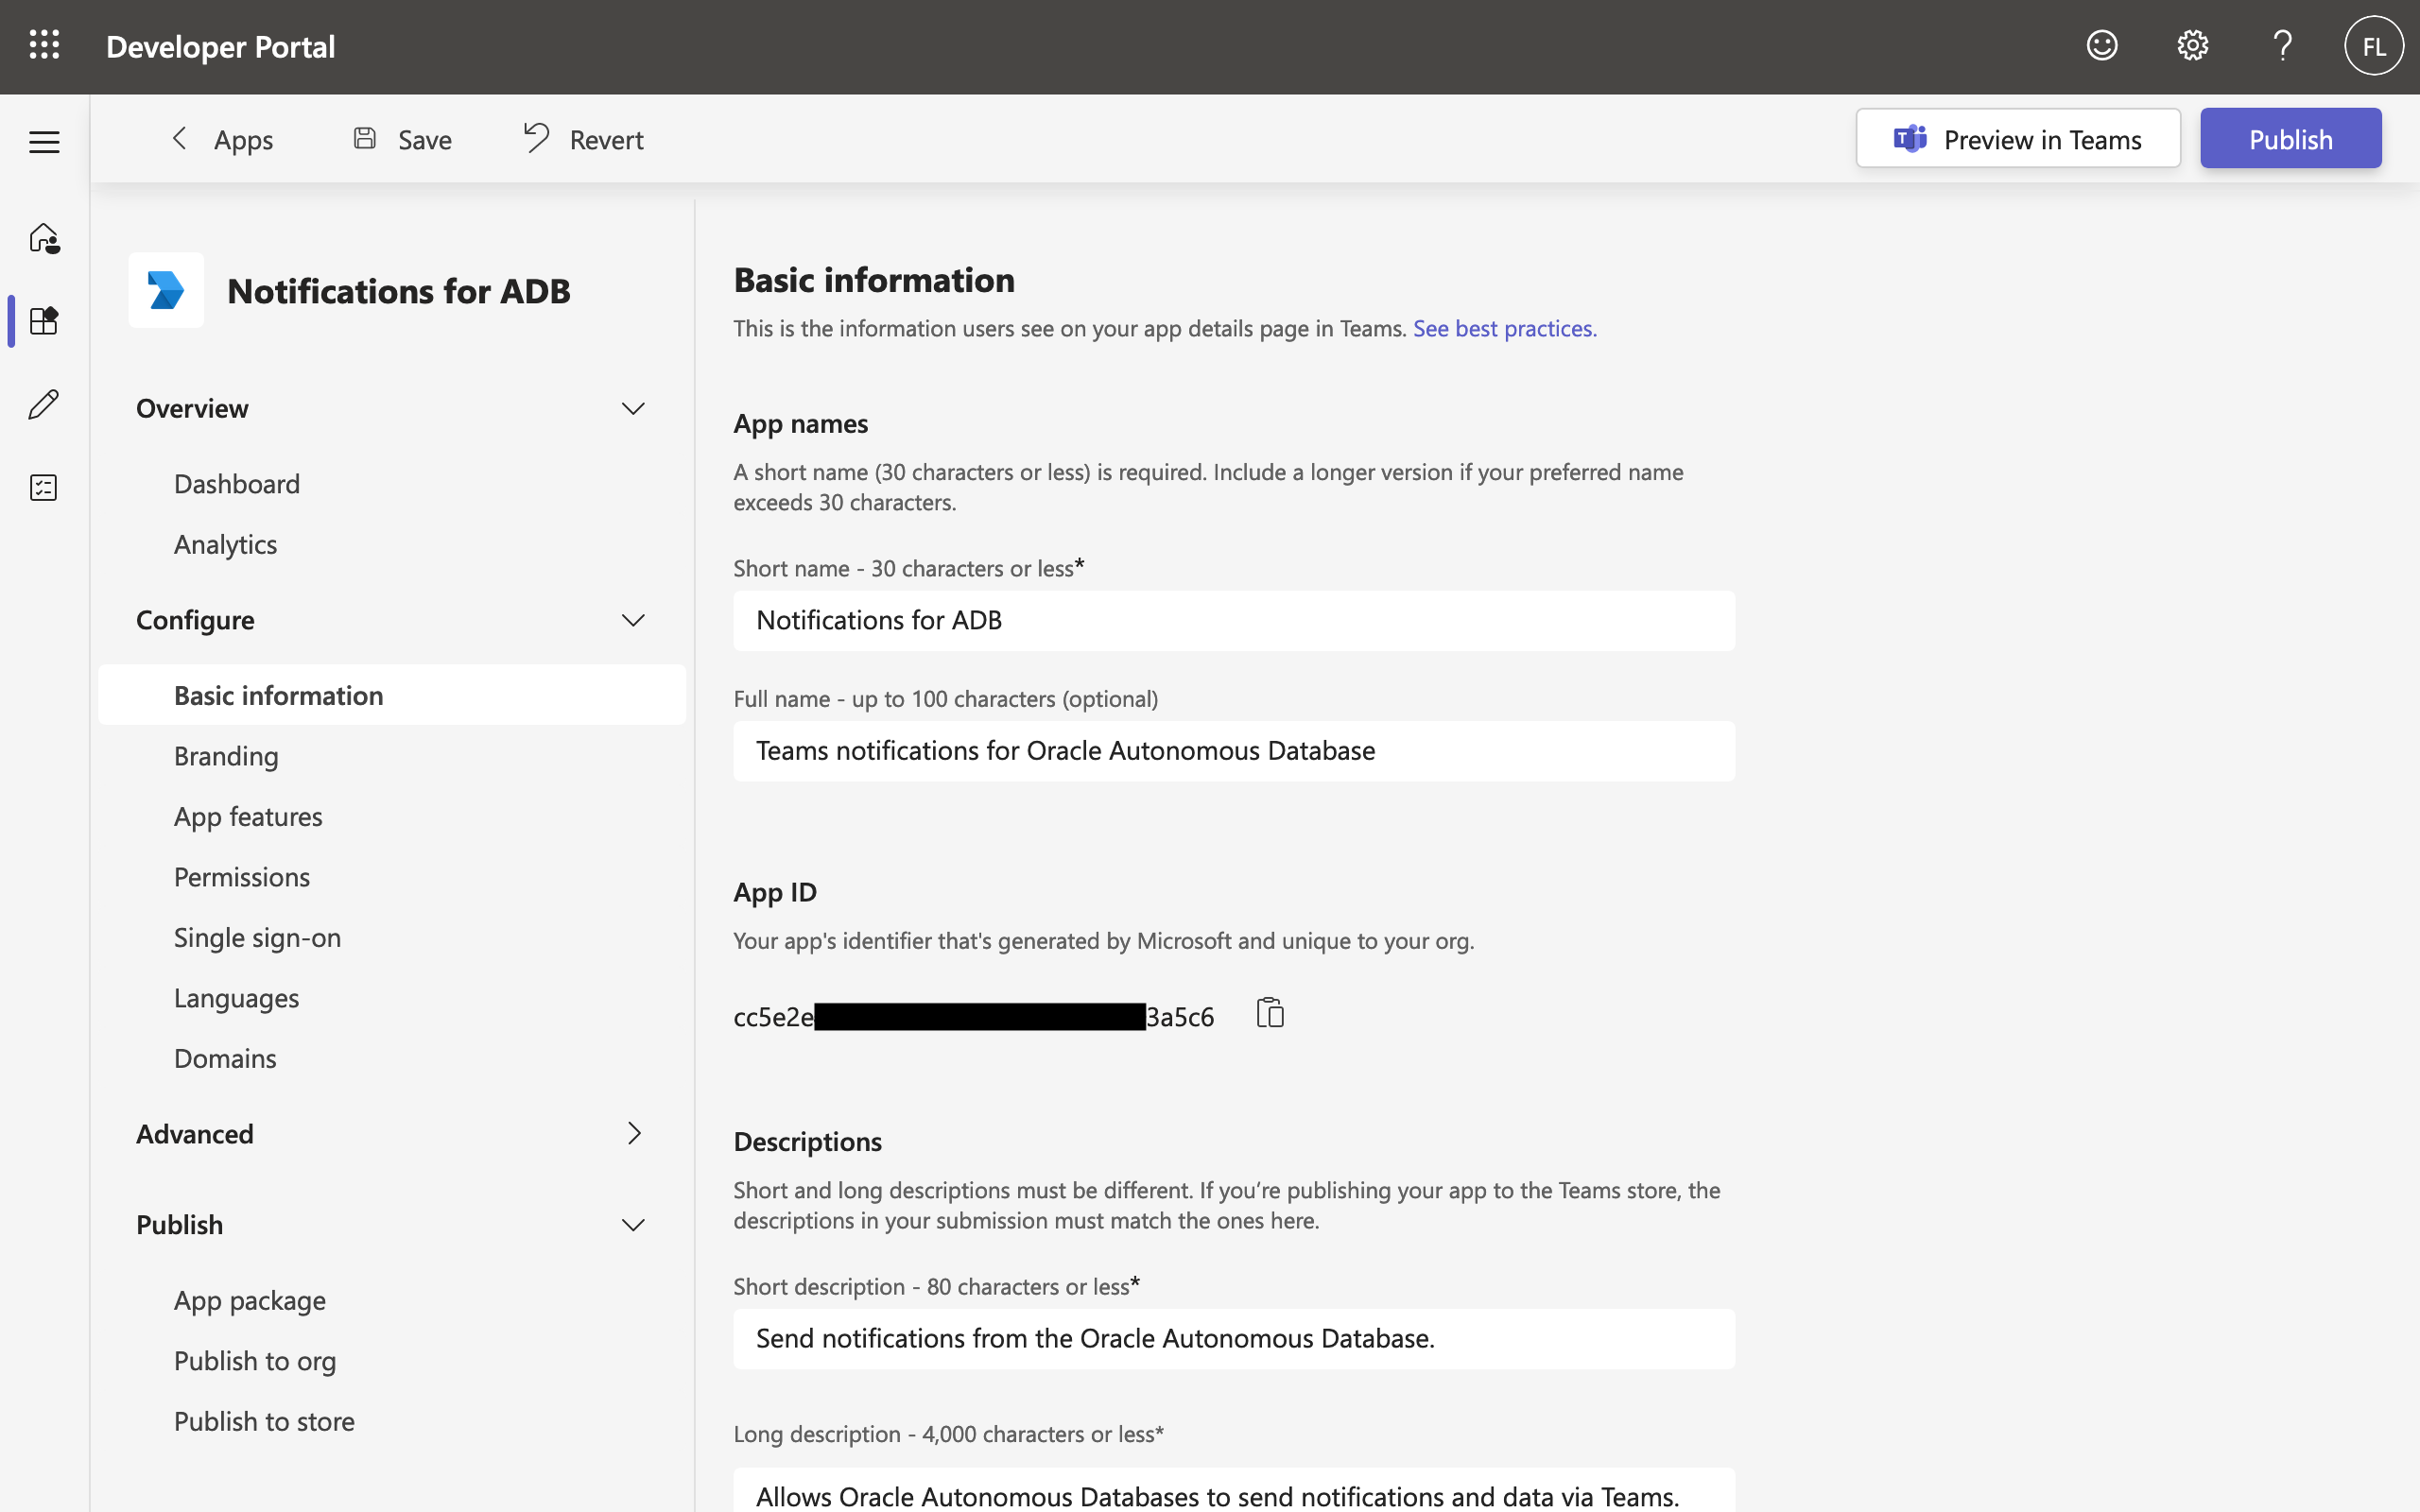
Other than the Application (client) ID, you must enter the required information to ensure the application passes validation and can be published successfully.
Once you are satisfied with what you have entered, save the changes, and then return to the Dashboard to make sure there are no errors or warnings. Correct any if necessary.
Create a Bot and Configure the App Feature
Next, create a Bot. You can either do this by navigating to Tools > Bot management, or from within the Apps interface, navigate to App features and then click Bot. There, you will find the link Create a new bot.
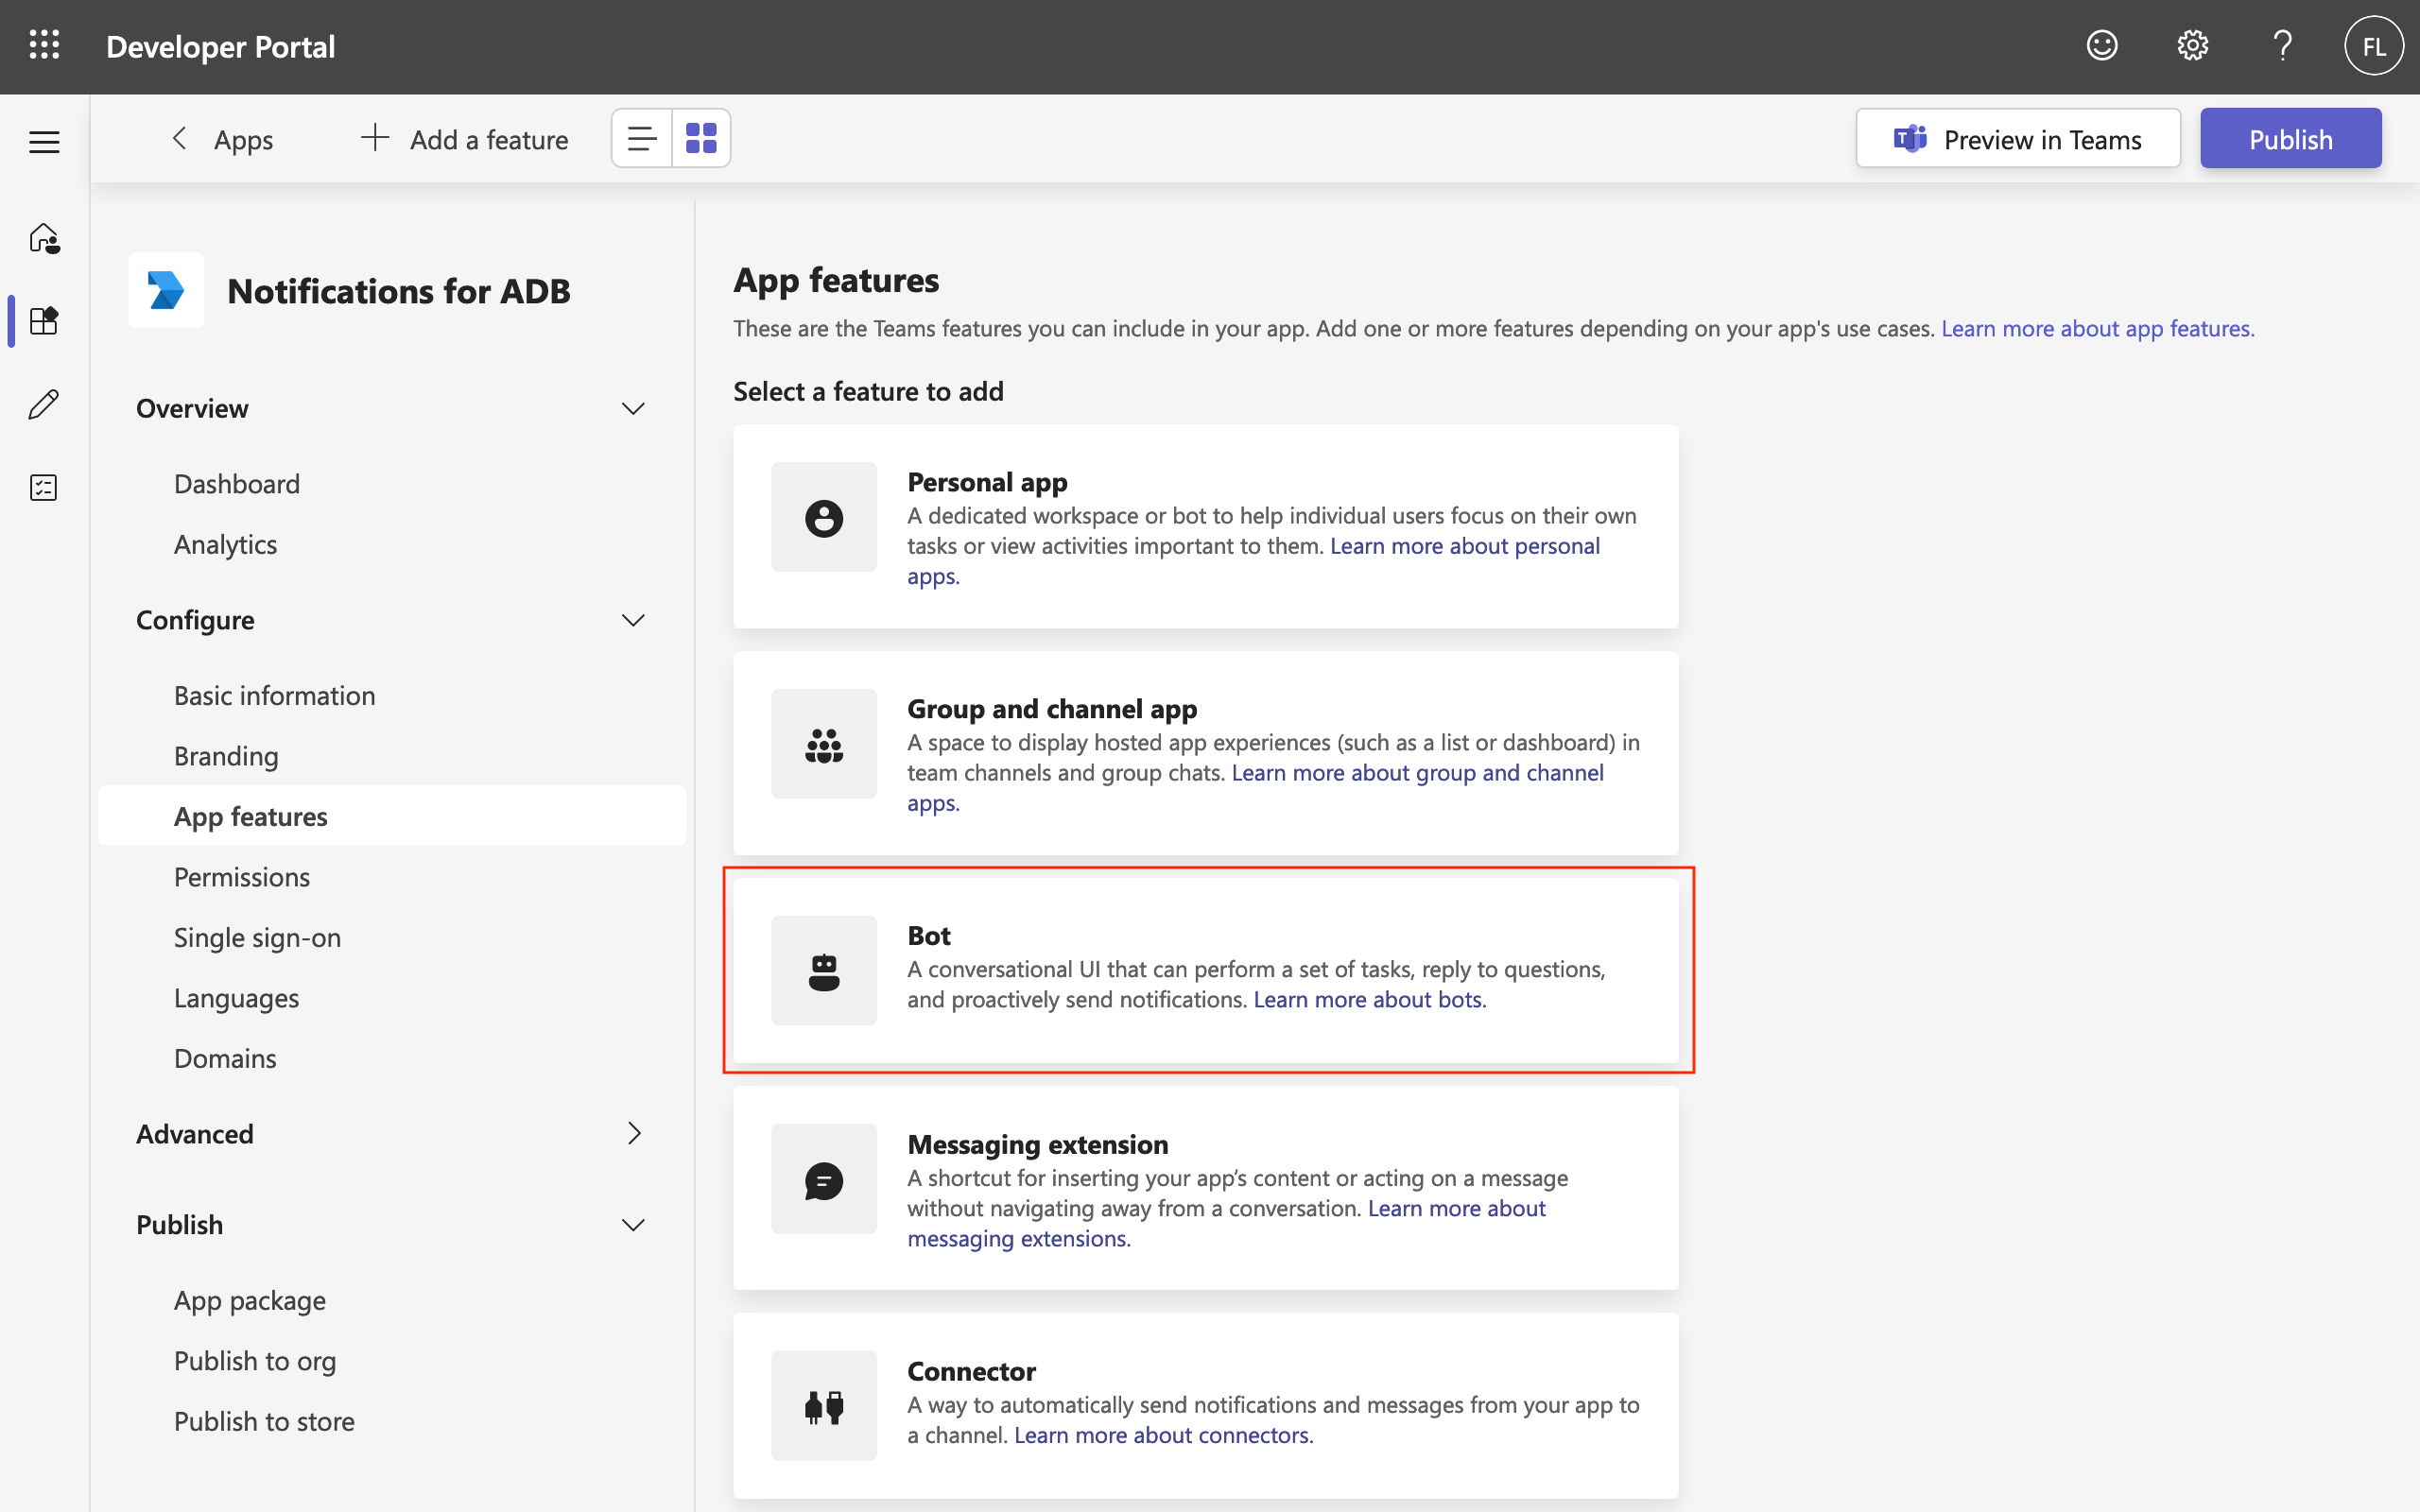
Creating a bot is simple. You will only need to provide a name for the bot. After the bot is created, you will be redirected to the bot's details page. Navigate to the Client secrets, and then click the button Add a secret client for your bot. Store the generated client secret securely as it will only be displayed once.

Return to the Bots management page and note the Bot ID as well.

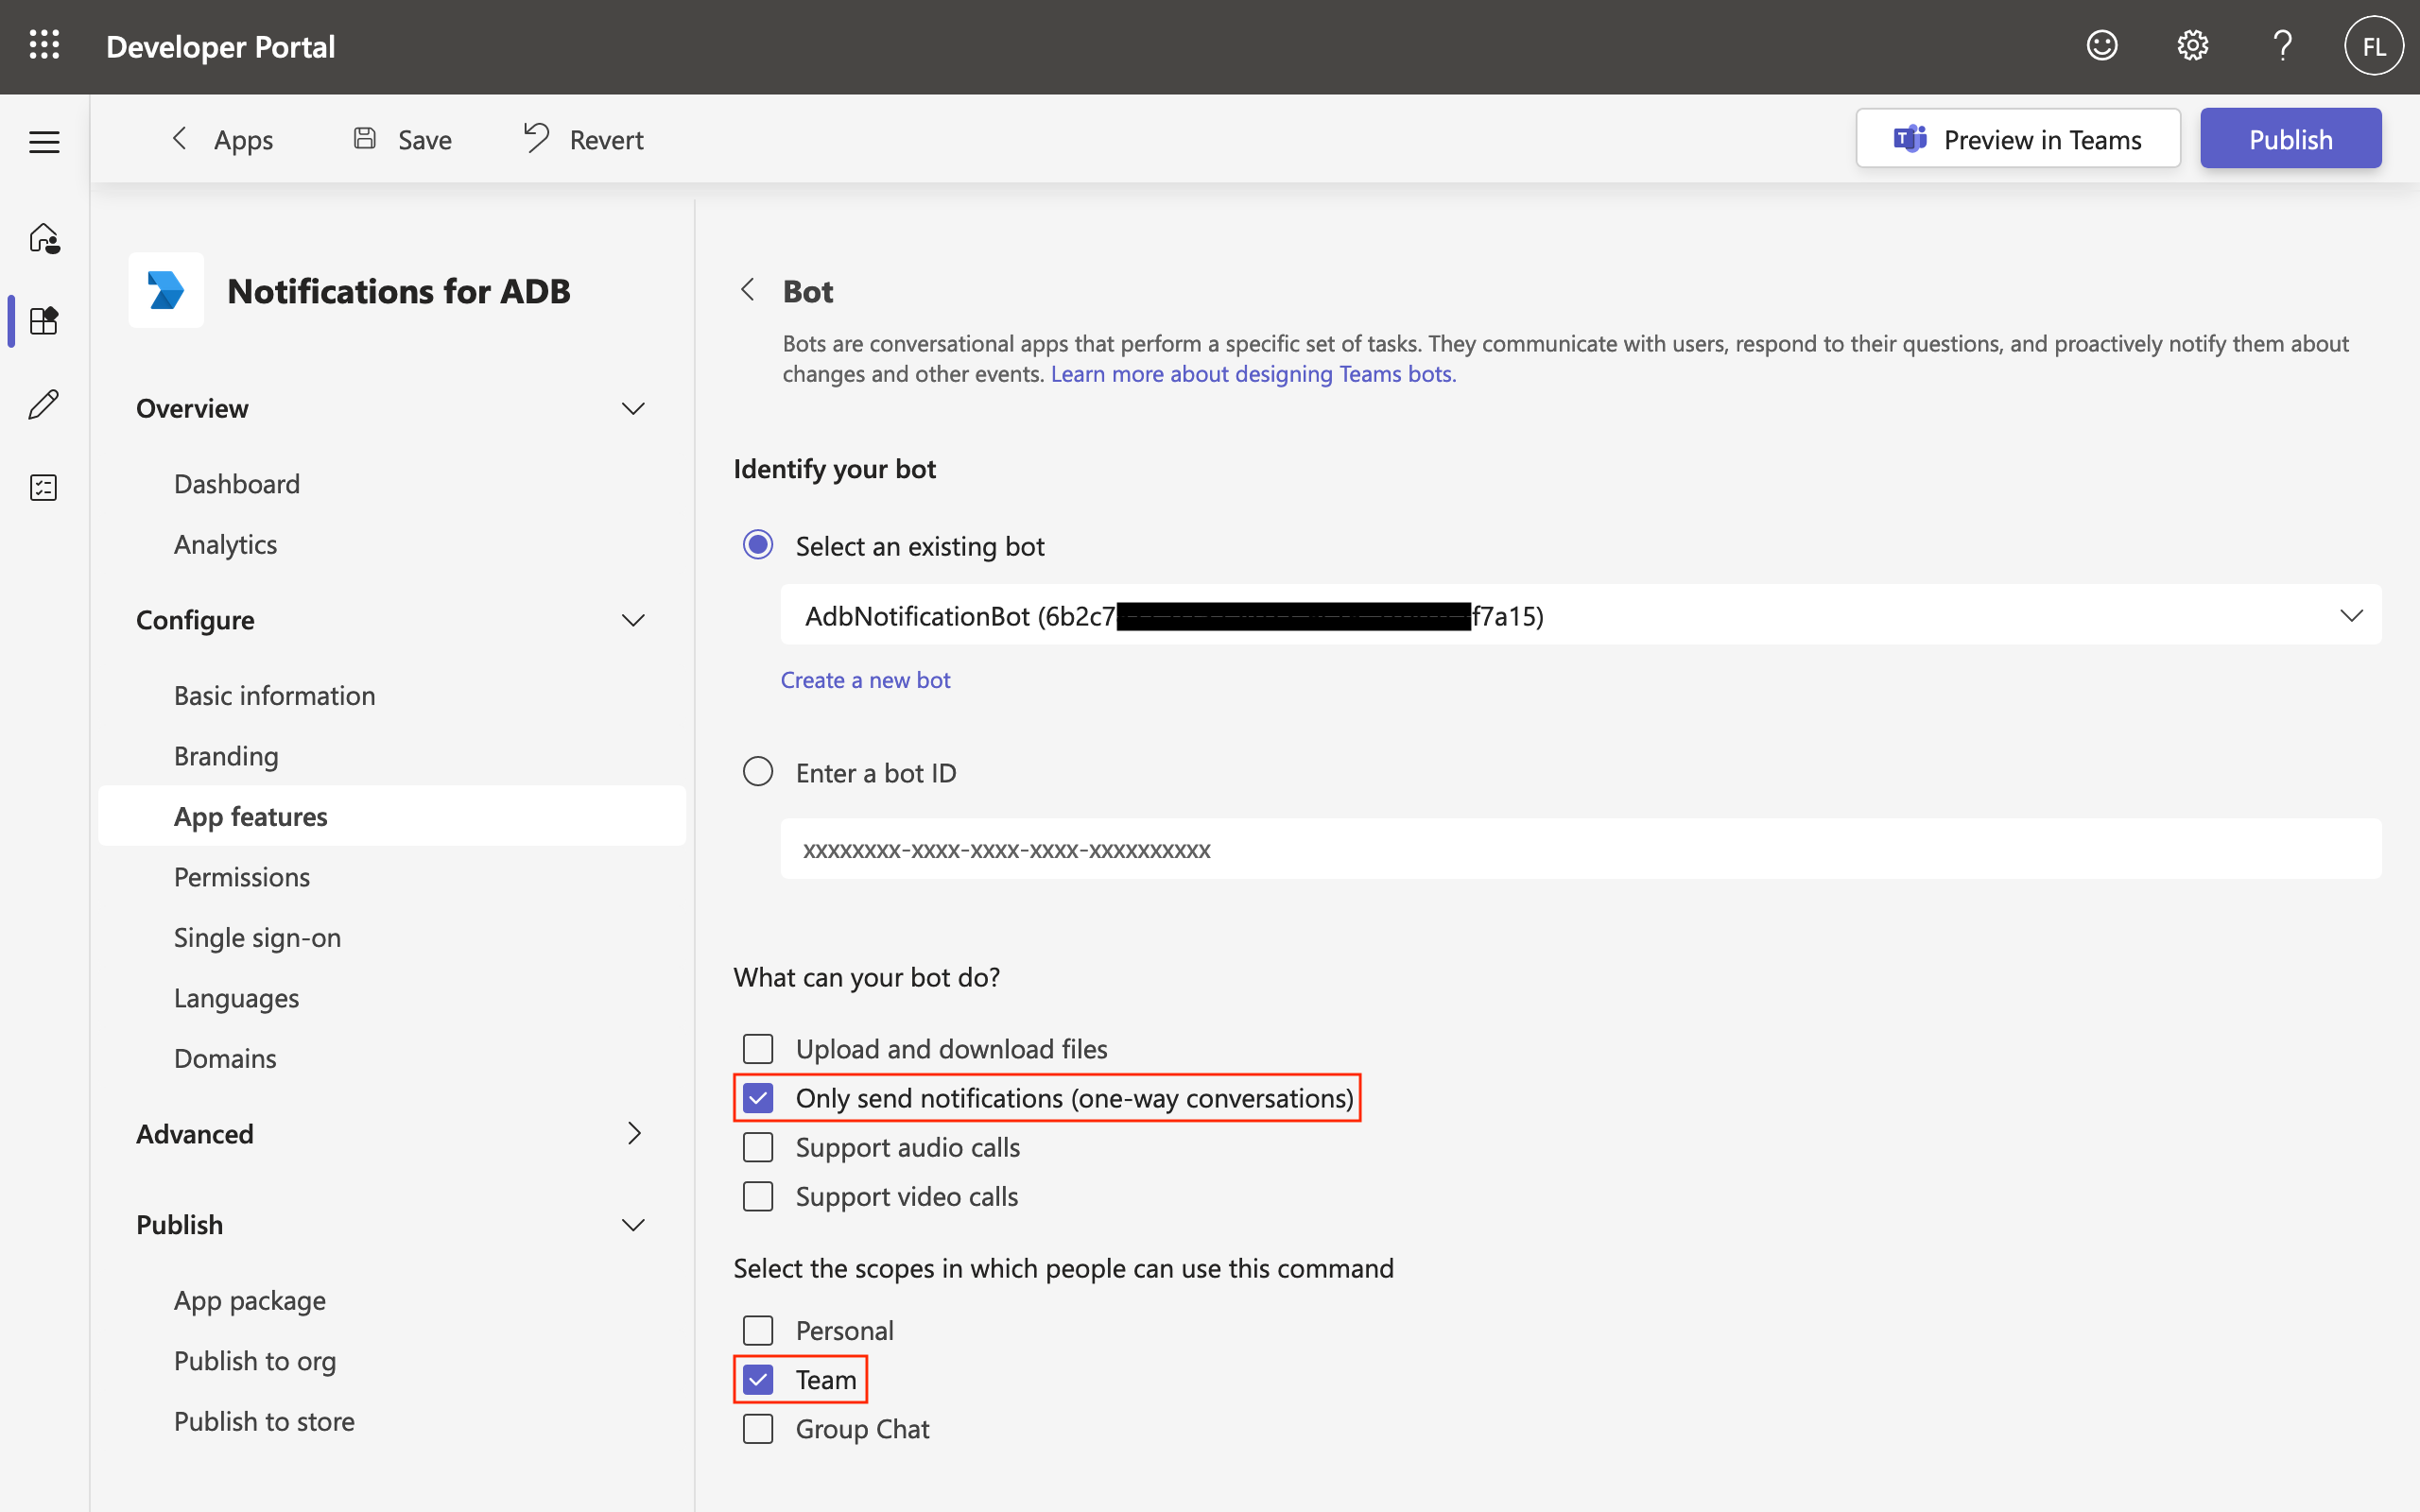
After the bot has been created, return to the bot configuration in the app's feature page. Select the bot that you have just created, select the actions that the bot can do, and the scope.
Publish the Application
On the app's details page, navigate to Publish > Publish to org. At the bottom of the page, there should be a button to submit the app for publication. Click it and inform the Teams administrator.
Tasks for Azure Active Directory Administrators
The next task involves defining the API permissions that the bot must have. If you do not have permission to access the Azure Active Directory (Azure AD) console, then please work with the administrator to complete this step.
When the bot was created, the platform automatically creates an App registration in Azure AD. You may access the app registrations using either Microsoft Entra or the main Azure portal. Locate the app registration for the bot and then navigate to the API permissions page. Add the following permissions:
Files.ReadWrite.AllSites.ReadWrite.AllChannelSettings.Read.All*
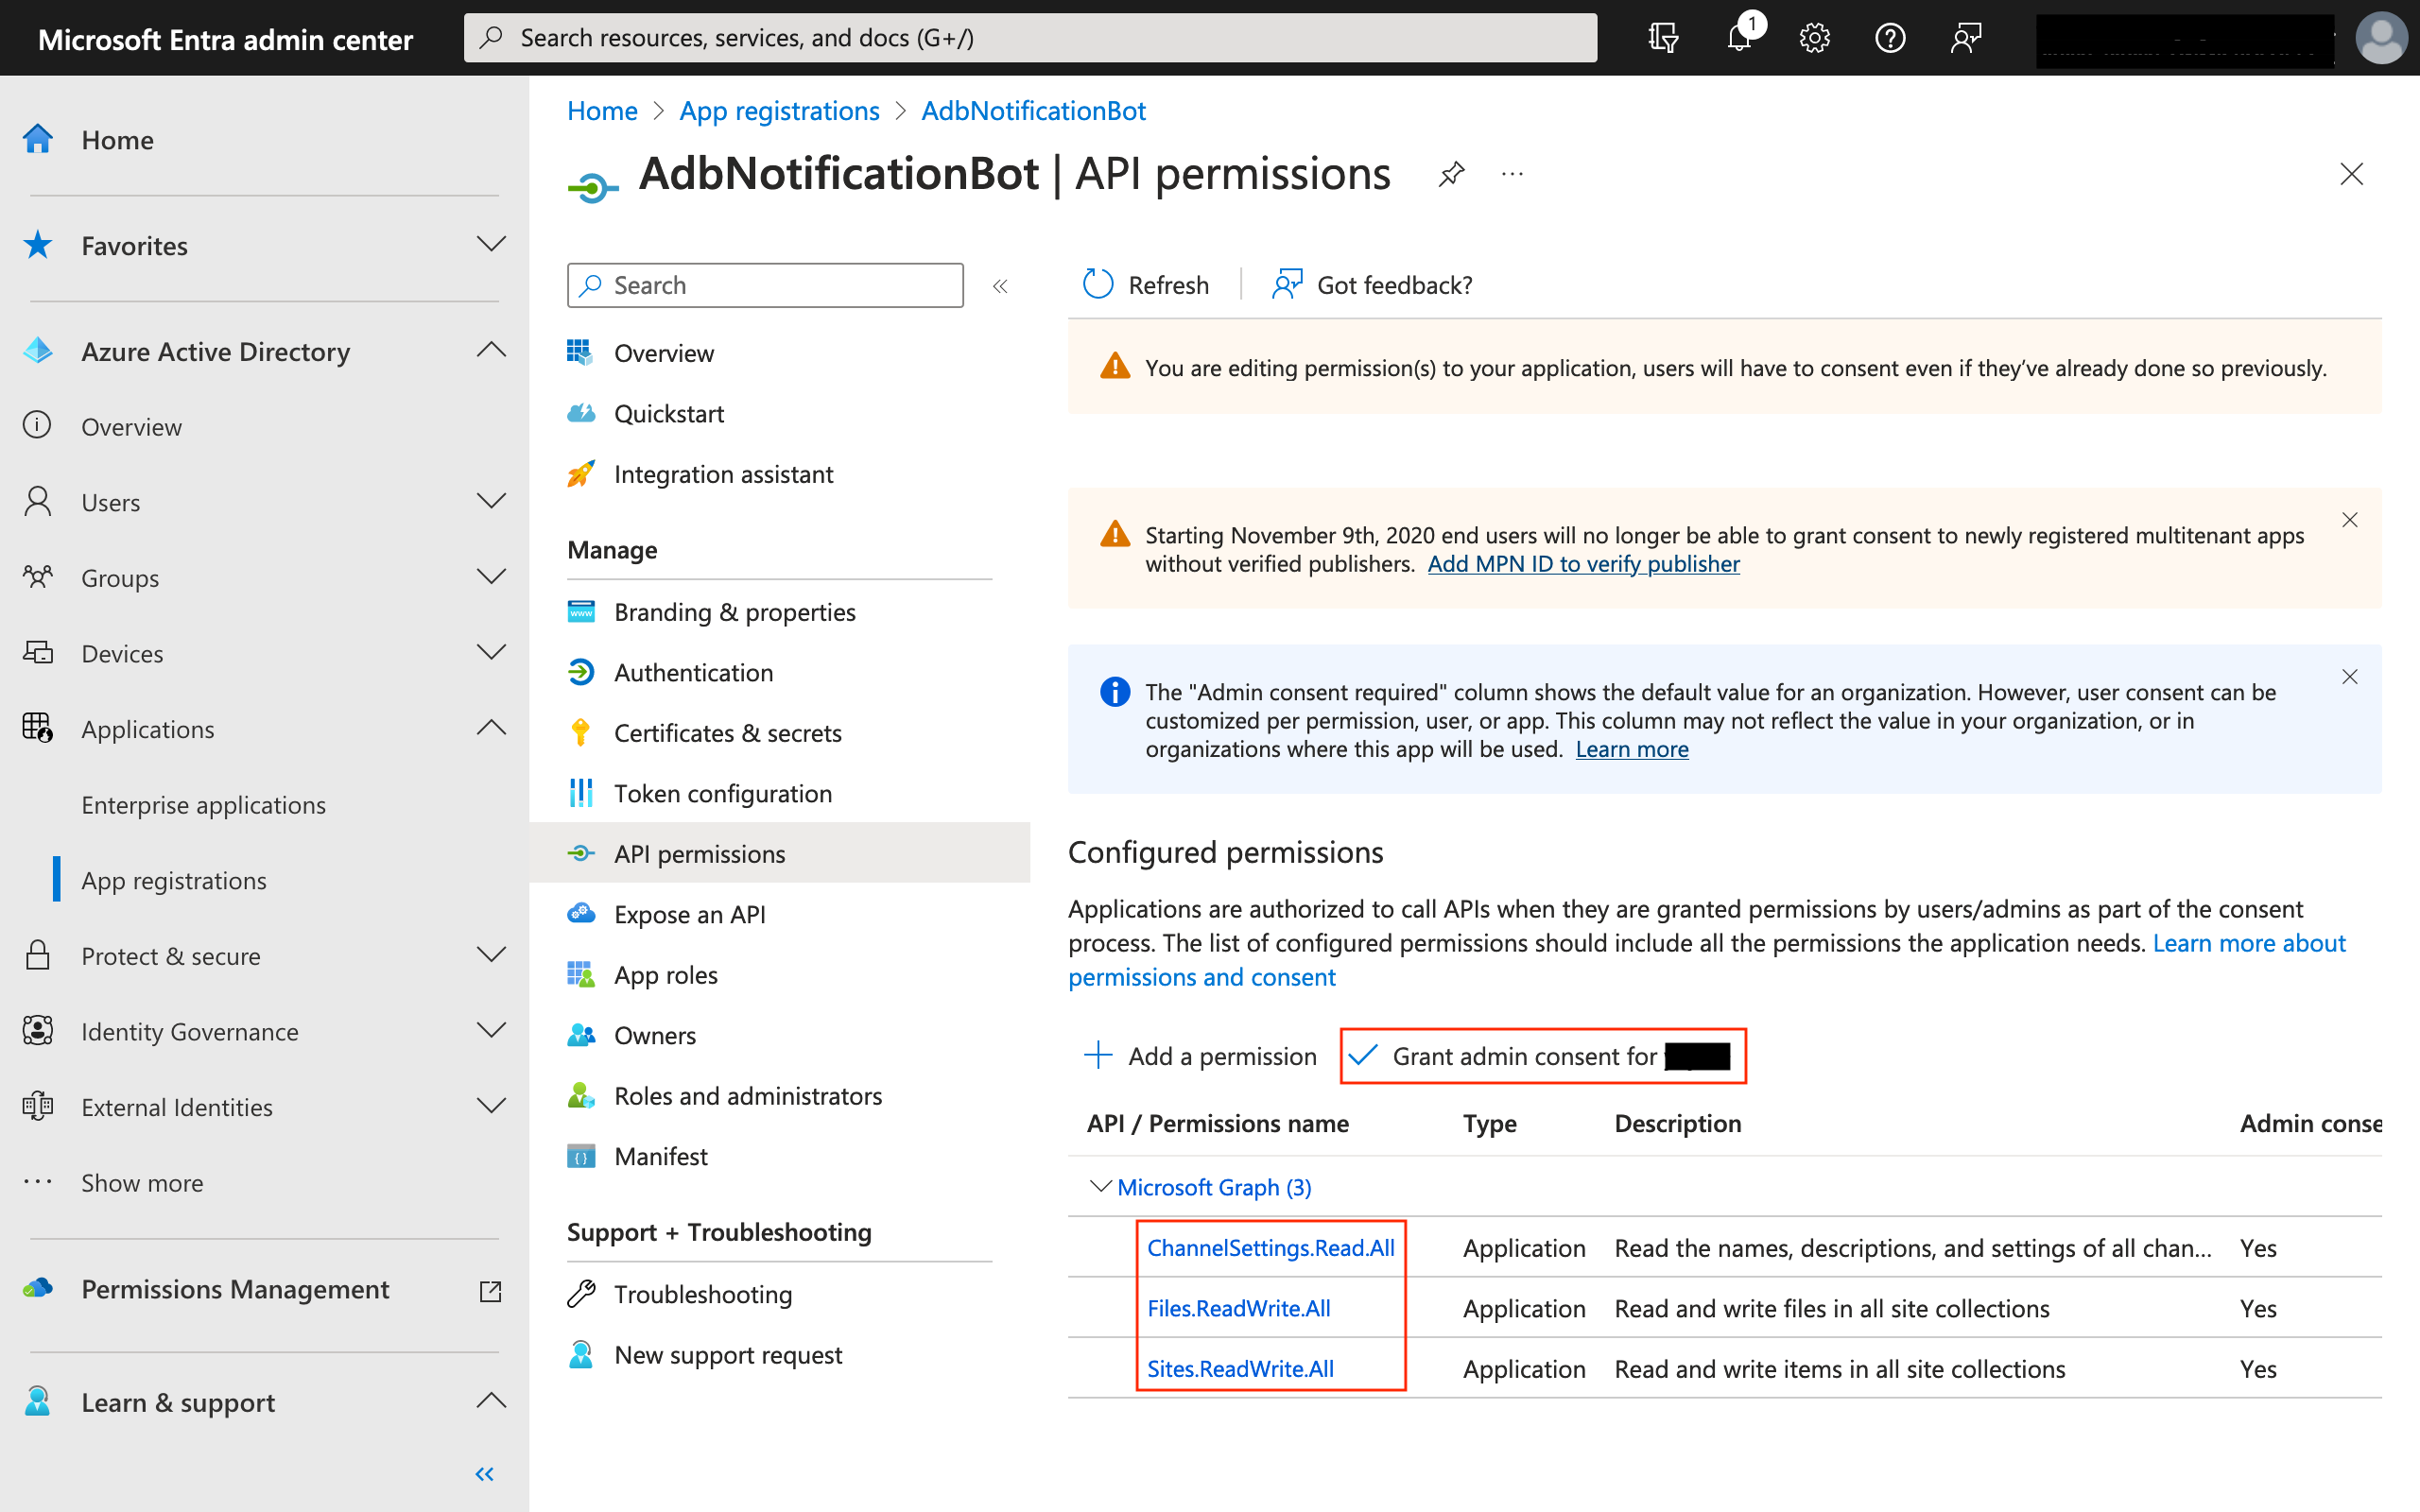
IMPORTANT The Oracle documentation does not include
ChannelSettings.Read.All. I will discuss this in a later section.
Finally, click the Grant admin consent for {{TENANT}} link to allow the bot to access the specified APIs.
Tasks for Teams Administrators
In this next set of tasks, again, you may have to work with the administrators for your Microsoft 365 tenancy or designated Teams administrator to approve and publish the Teams application. Access the Teams admin console here.
Navigate to Teams apps > Manage apps. The first thing you might notice is that there is an app that has been submitted and pending approval. In the table below, search and locate the application you have created.
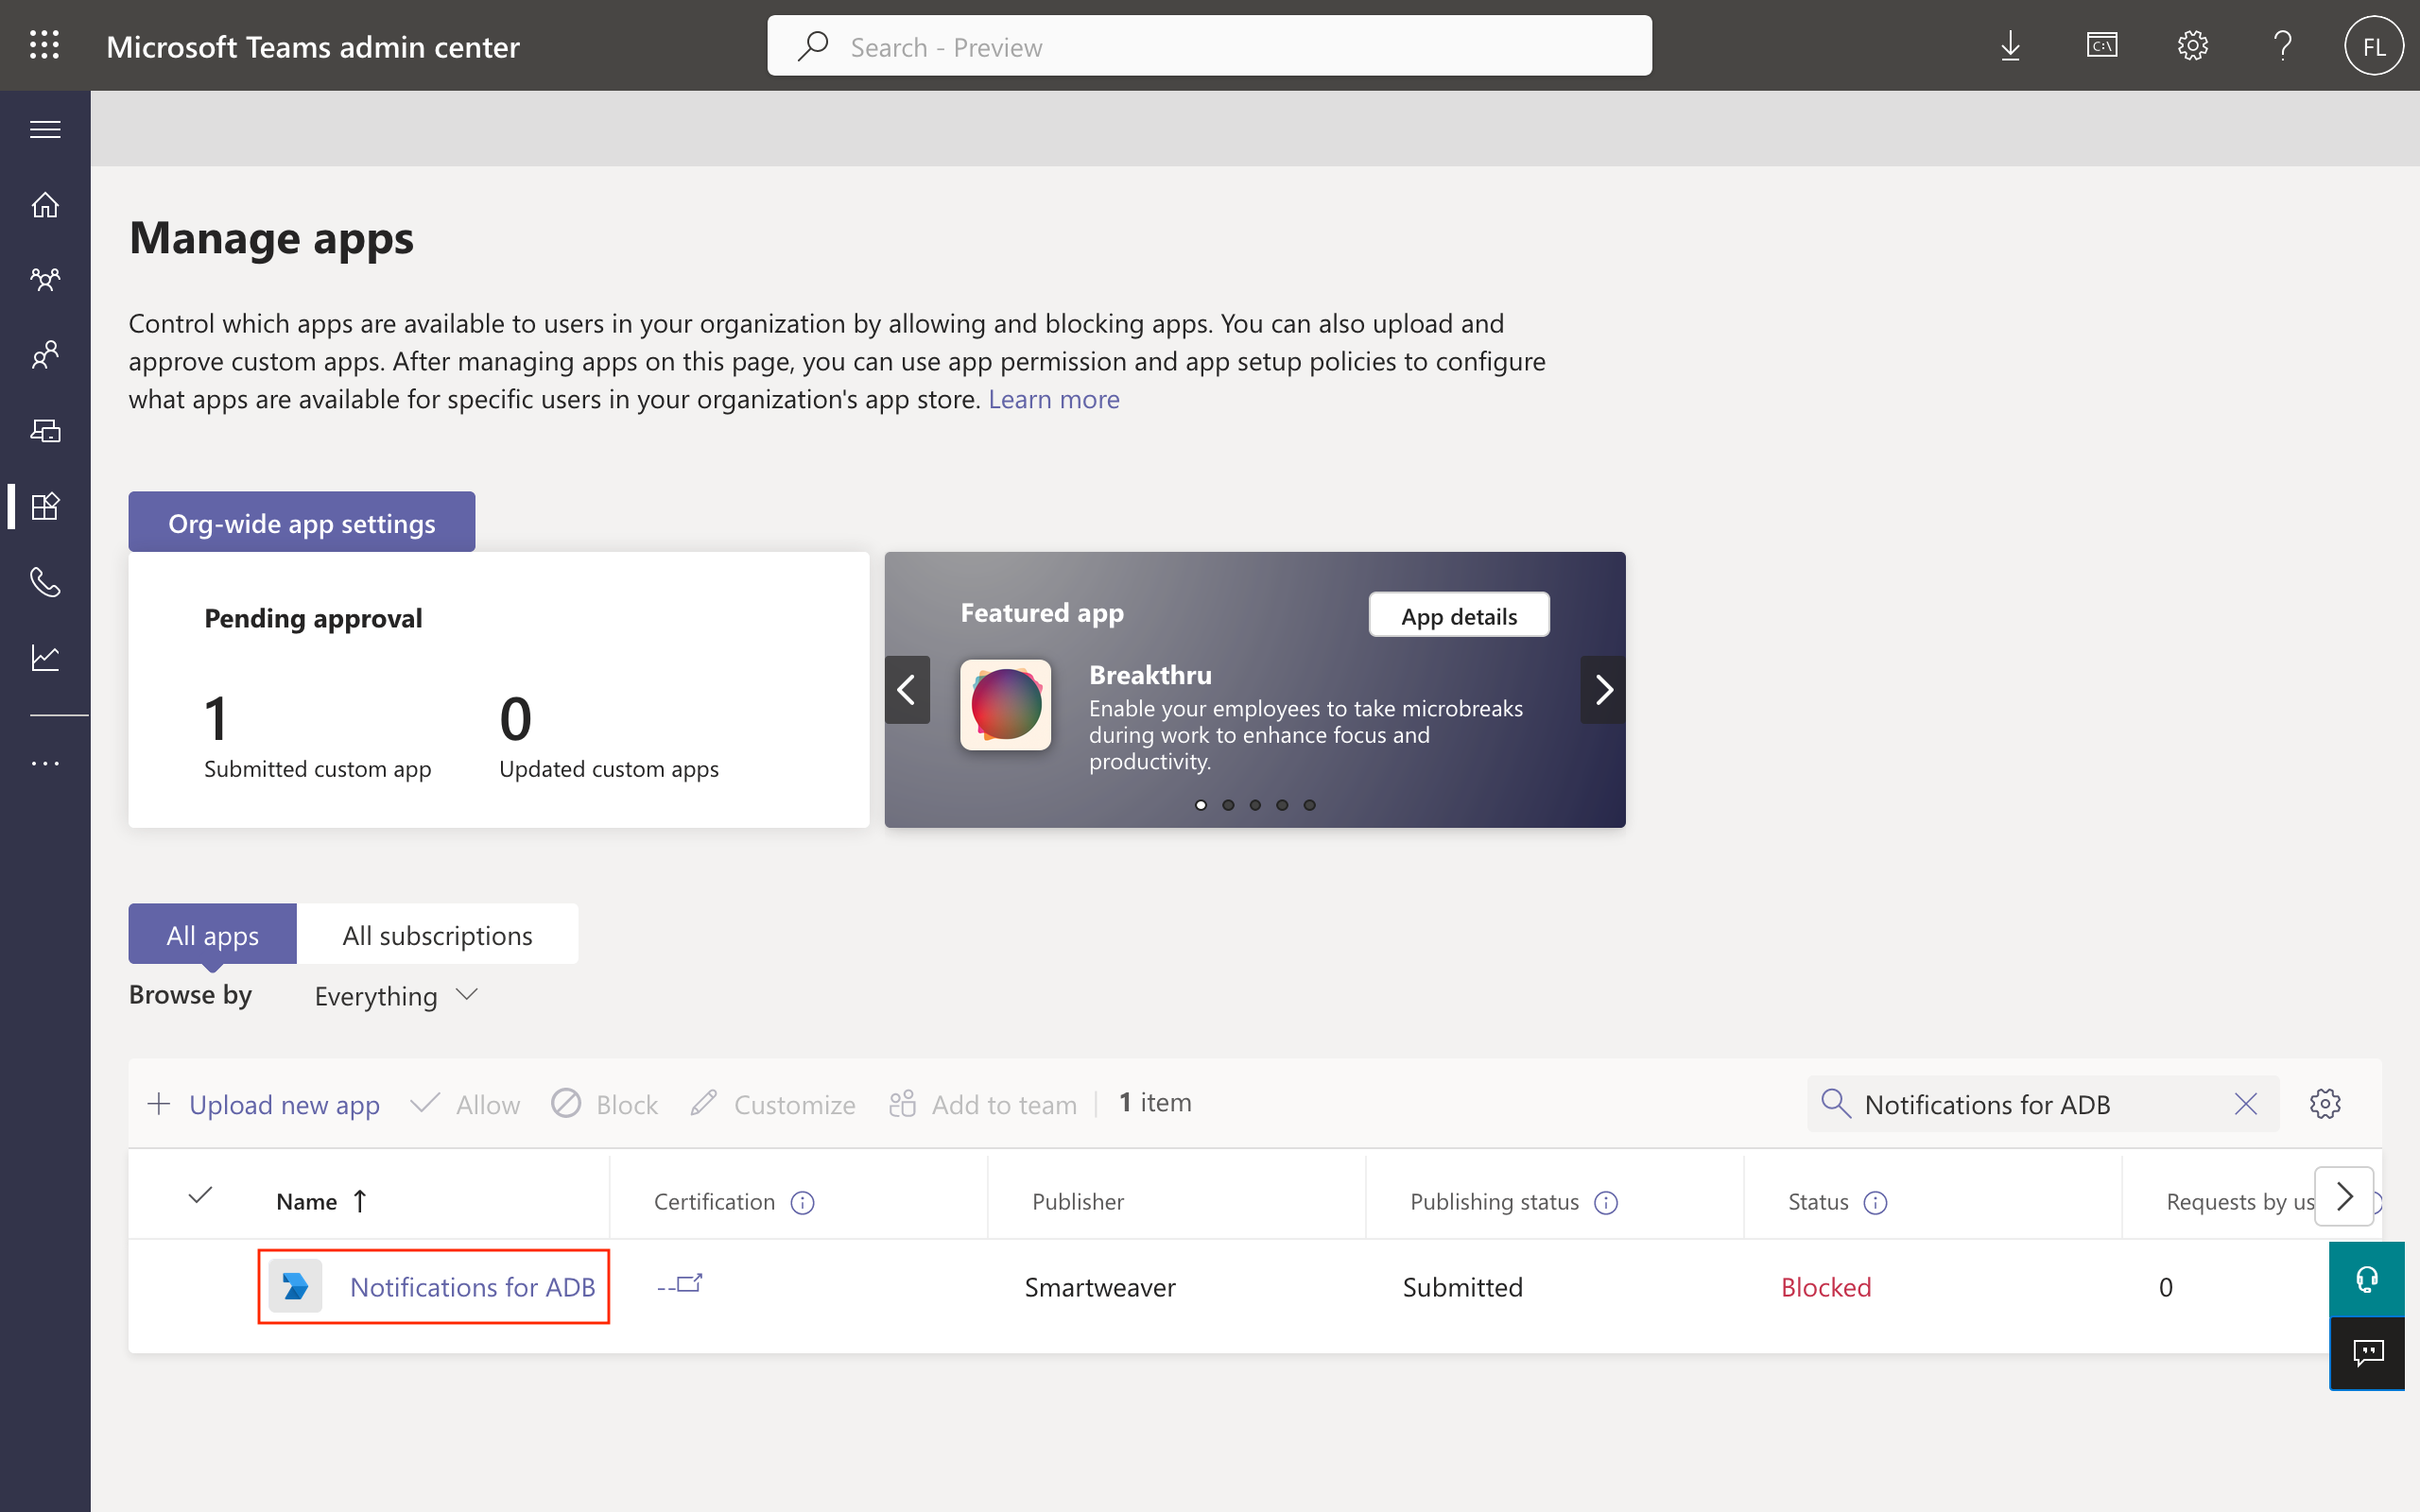
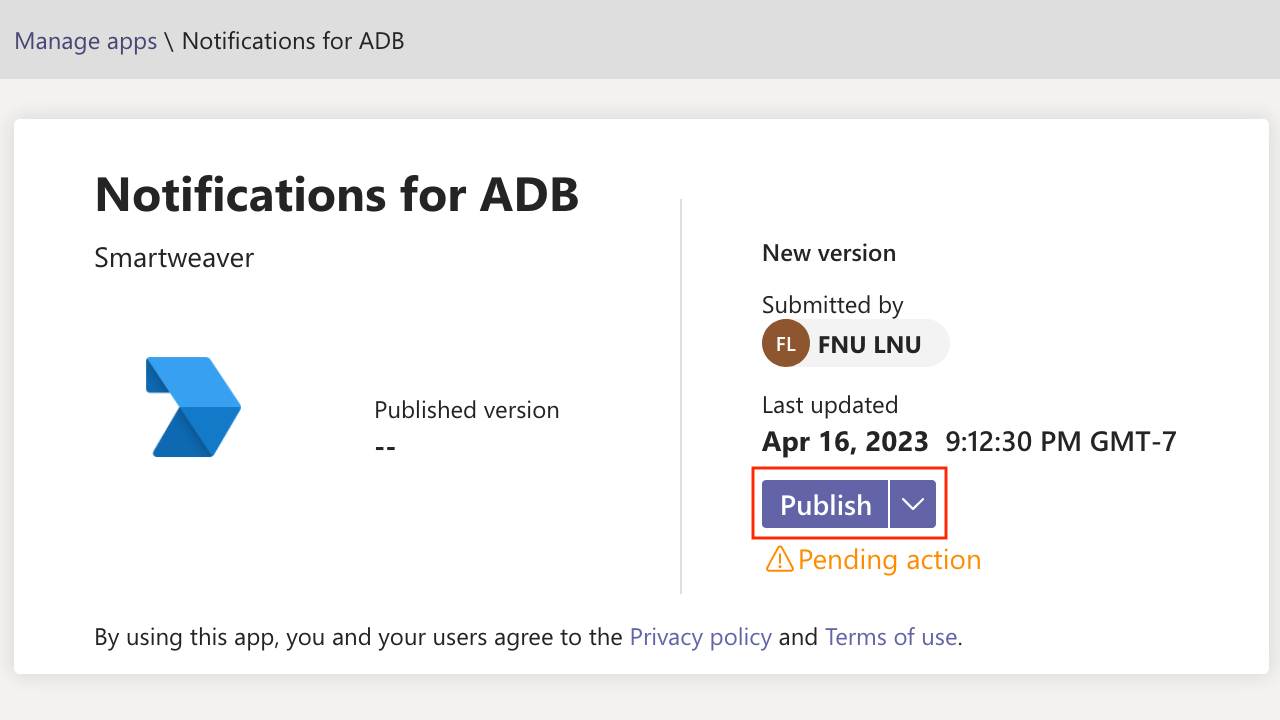
Click on the app, and on the app's details page, click Publish to approve the application for use in Teams.
It takes a little while for the app to show up in Teams for it to appear in the Teams Apps store under Built for your org category and then add it to team. A quick workaround is to add it to the team immediately using the admin console as show in the figure below.
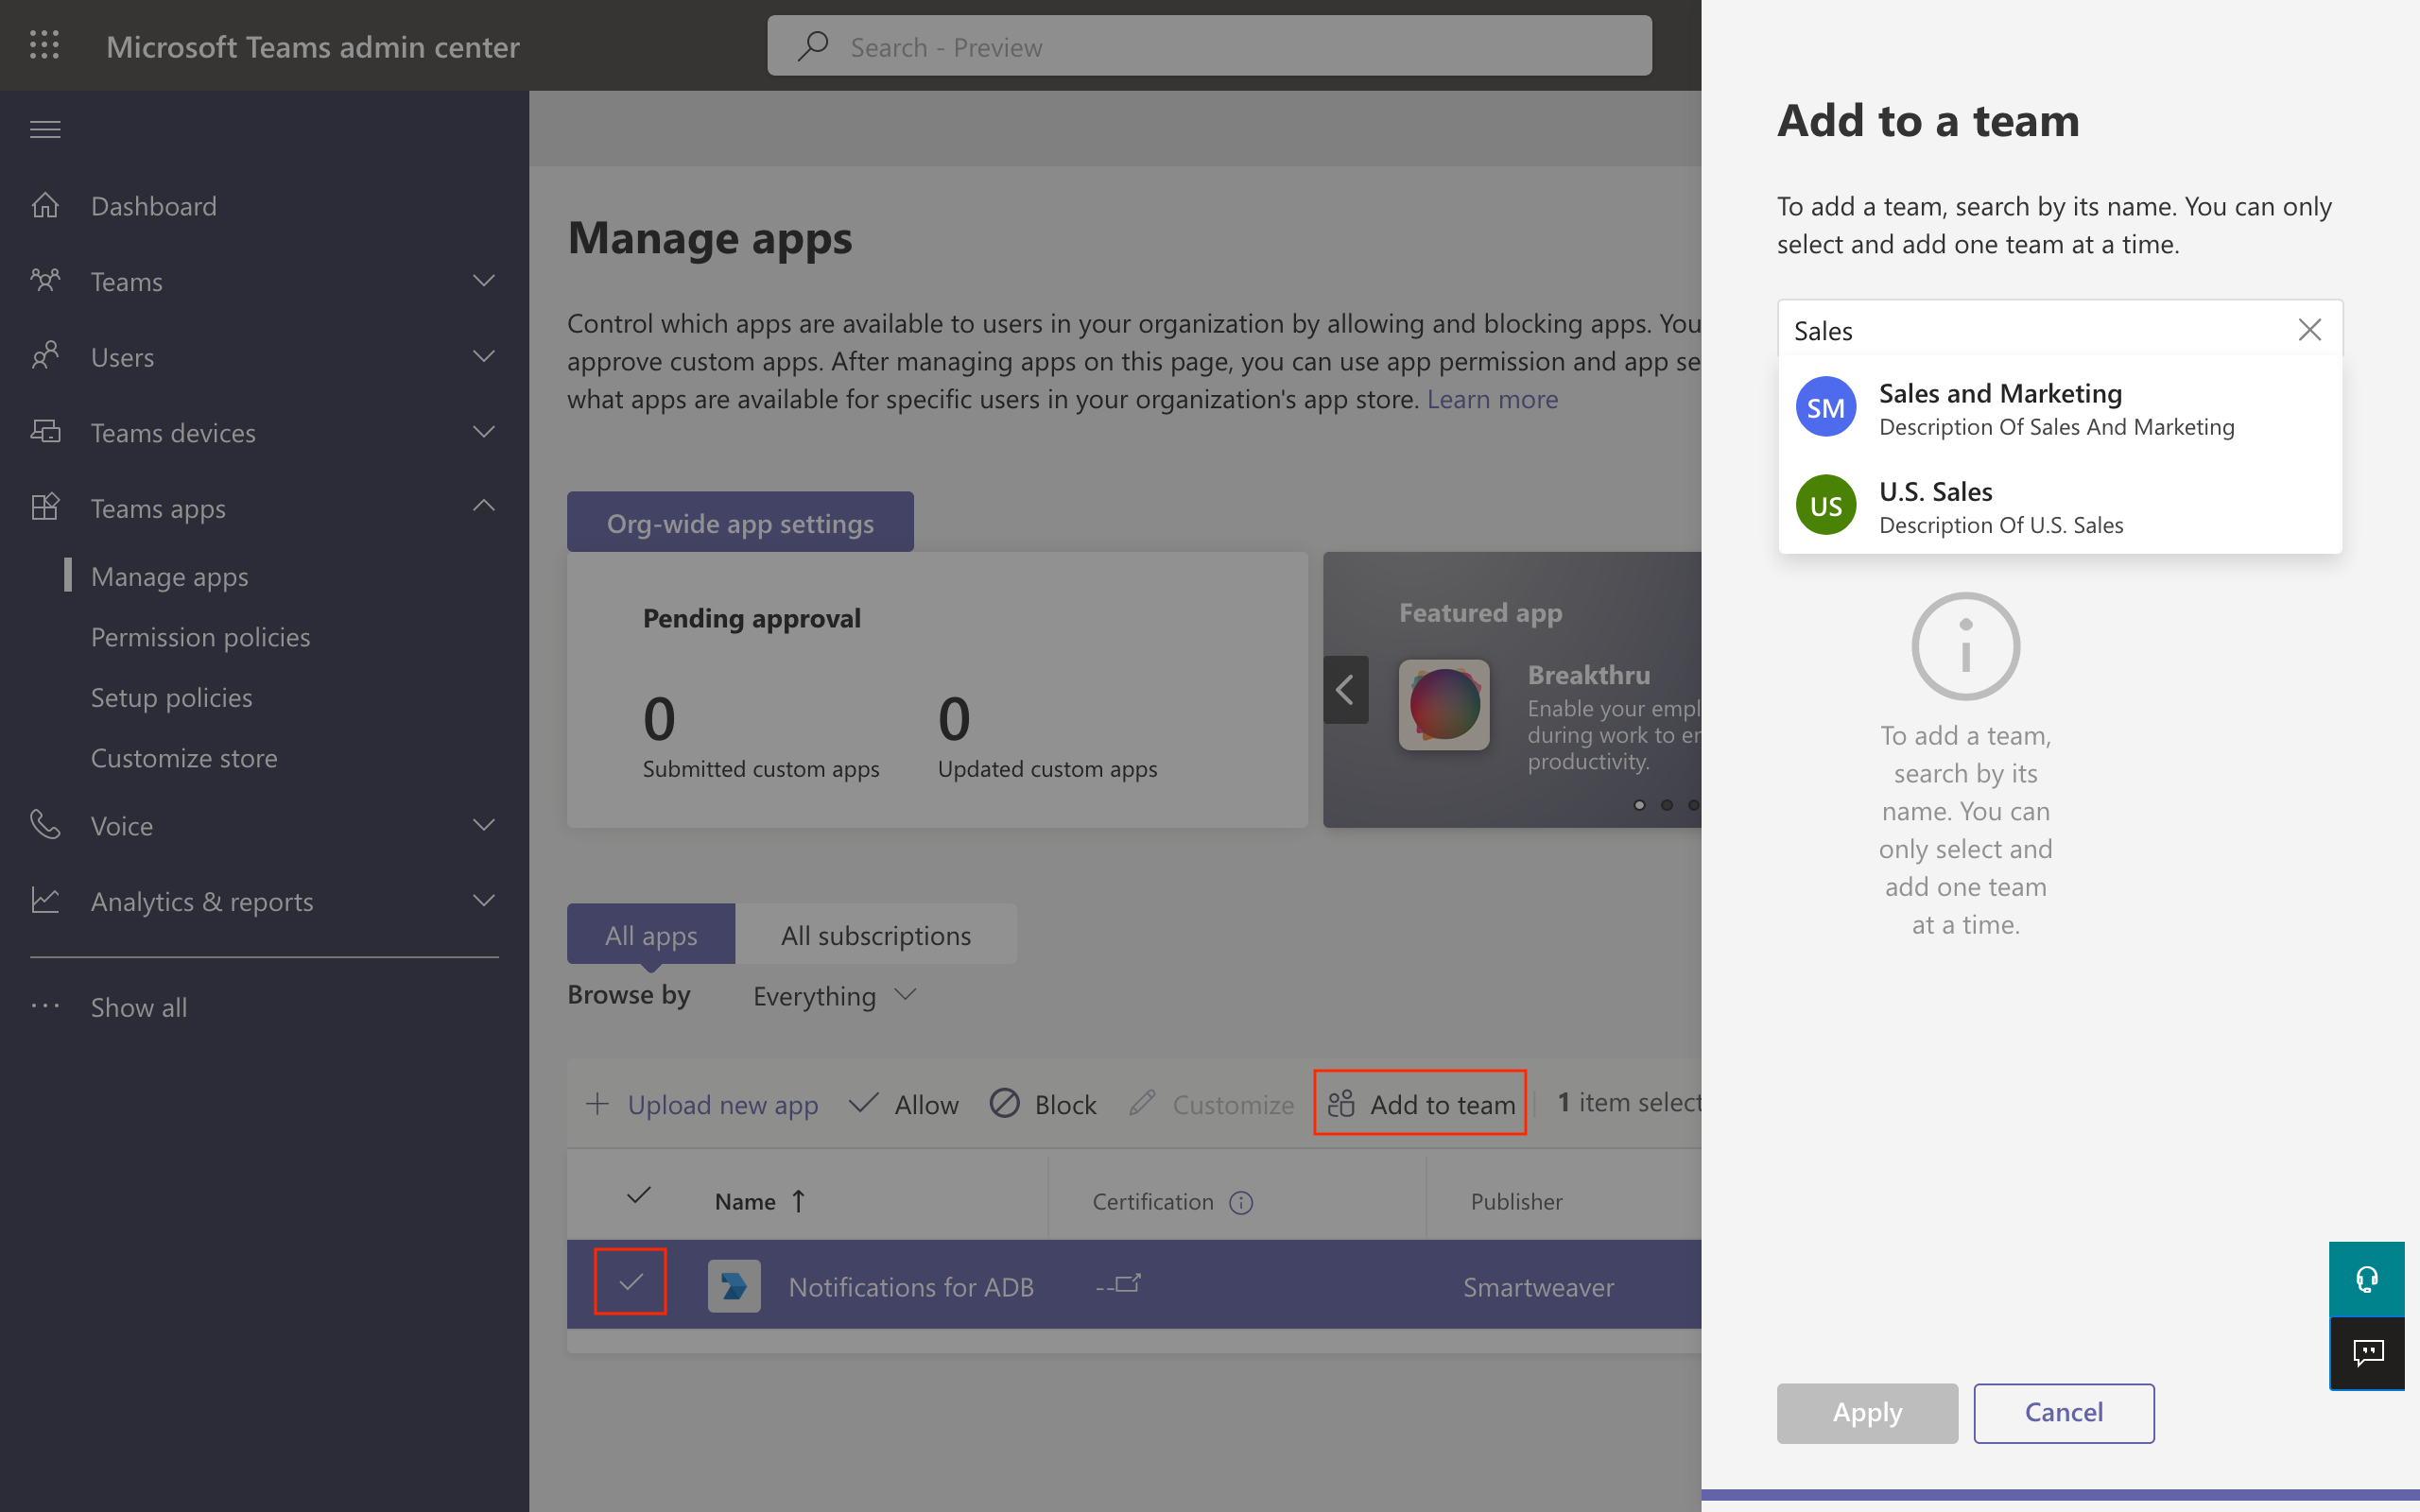
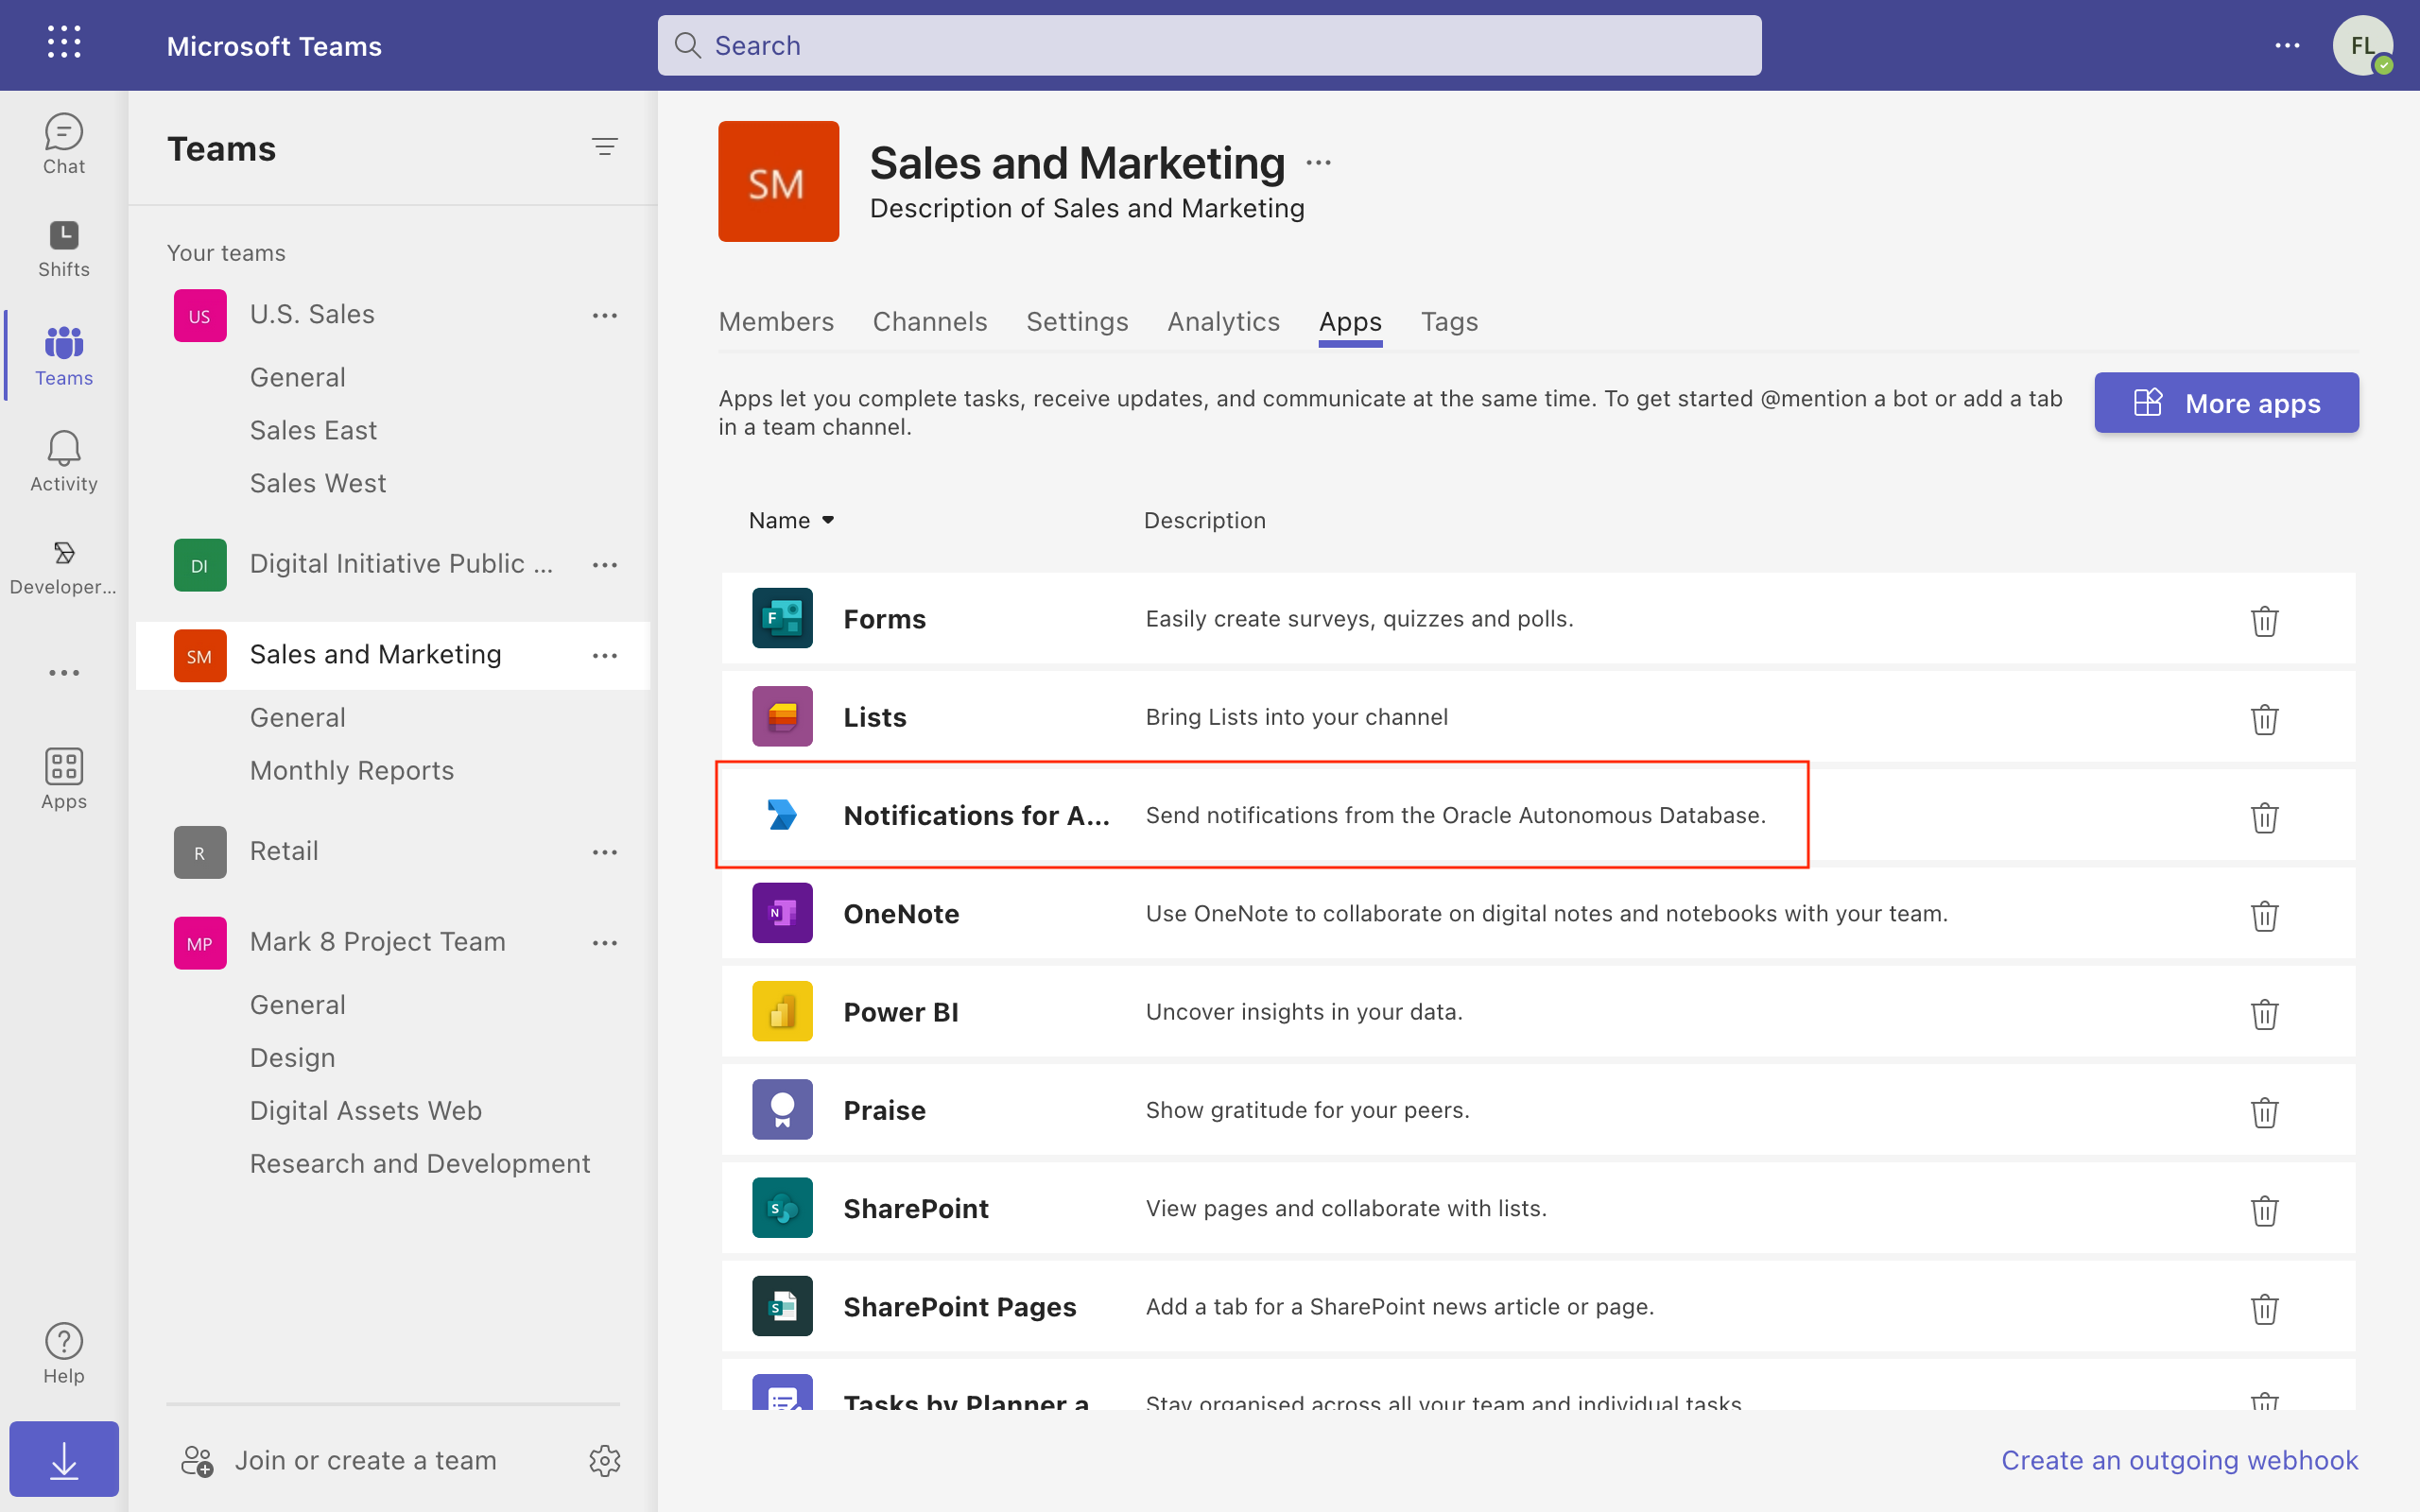
In the table of apps, select the application and then click the button Add to team. Select the team you wish to add the app to, and then click the button Apply. Back in Teams, you may validate by accessing the team's management page and then click the tab Apps. You should see that the app has been added to the team.
Sending Messages and Data to Teams
Now that you have fulfilled the prerequisites, it is time to test this feature.
Create Credential
In the document, it is stated that the ADB's ADMIN should create the credential, but I have tested it to work even with the credential created by the user. However, the schema that you wish to use to create the credentials must have execute privilege on the DBMS_CLOUD package.
Create the credential using the bot ID and secret:
begin
  dbms_cloud.create_credential(
    credential_name => 'TEAMS_CRED'
    , username => '6b2c7*****f7a15'
    , password => 'Abd8Q*****BSc~i'
  );
end;
/
Team Channel Link
In order to send messages and data, you will need three parameters obtained from either the team's or channel's link. They look something like these:
- Team's link
https://teams.microsoft.com/l/team/19%3a94d8e*****d68aa%40thread.tacv2/conversations?groupId=23e1c*****ba568&tenantId=7d58a*****c60a0
- Team channel's link
https://teams.microsoft.com/l/channel/19%3aa94d8*****d68aa%40thread.tacv2/Monthly%2520Reports?groupId=23e1c*****ba568&tenantId=7d58a*****c60a0
The information you will need are the {{TEAM}}, {{CHANNEL}} and {{TENANT}} components as marked below:
- From the team's link
https://teams.microsoft.com/l/team/{{TEAM}}/conversations?groupId=23e1c*****ba568&tenantId={{TENANT}}
- From the team channel's link
https://teams.microsoft.com/l/channel/{{CHANNEL}}/General?groupId=23e1c*****ba568&tenantId={{TENANT}}
The values for the parameters are:
tenant=>{{TENANT}}team=>{{TEAM}}channel=>{{CHANNEL}}
IMPORTANT The team ID derived from the team's link is the same as the ID of the team's General channel.
Send Message
With that information handy, you are now ready to send a message to the team. In this example, we will send a message to the channel General for the team Sales and Marketing using the following PL/SQL procedure:
begin
  dbms_cloud_notification.send_message(
    provider => 'msteams'
    , credential_name => 'TEAMS_CRED'
    , message => '**SUCCESS!** message sent from '
        || sys_context('USERENV','DB_NAME')
    , params => json_object('channel' value '19%3a94d8*****d68aa%40thread.tacv2')
  );
end;
/
You should see the message appear in Teams shortly.

Did you see that? There's support for Markdown! Bot messages support plain-text, Markdown, and XML formats as documented here.
Send Data
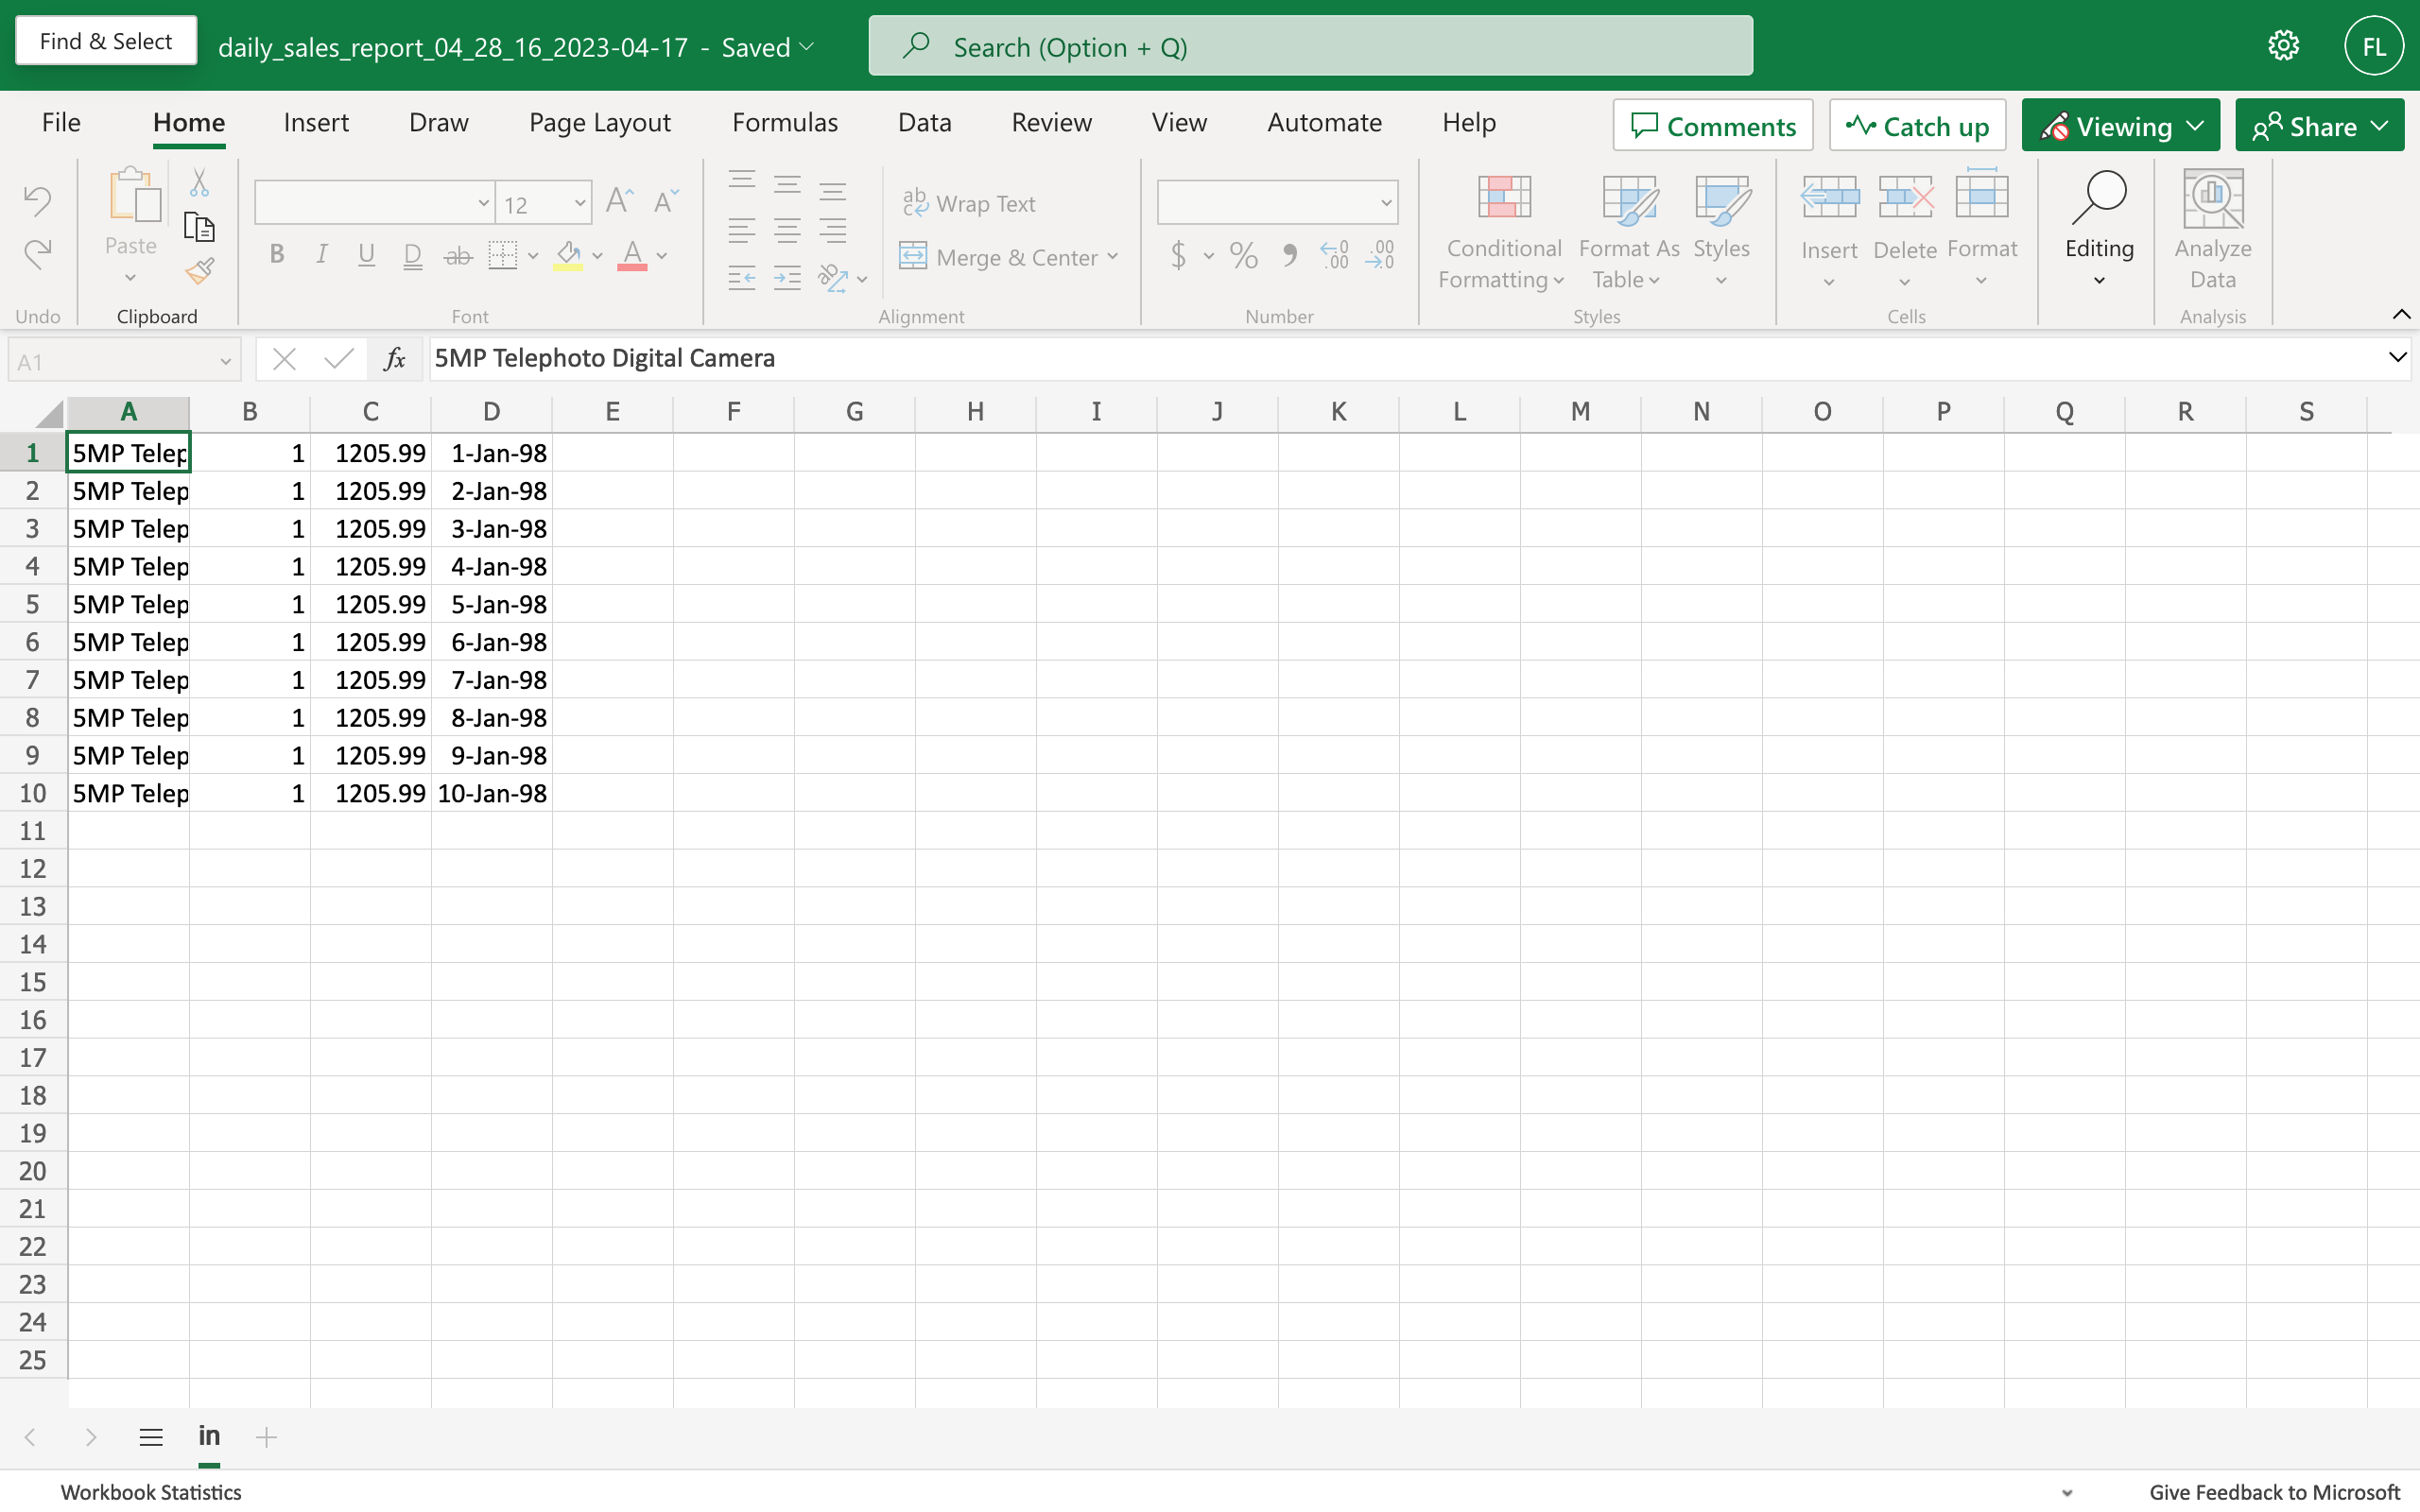
Next, we will attempt to query the sample data available in the ADB's SH schema, and then send it to the same channel in CSV format. Execute the following code:
declare
l_sql clob := q'[select
  p.prod_name
  , s.quantity_sold
  , s.amount_sold
  , t.day_number_in_month || ' ' || t.calendar_month_name || ' '
      || t.calendar_year as sold_on
from sh.sales s
join sh.products p on p.prod_id = s.prod_id
join sh.times t on t.time_id = t.time_id
fetch first 10 rows only]';
begin
  dbms_cloud_notification.send_data(
    provider => 'msteams'
    , credential_name => 'TEAMS_CRED'
    , query => l_sql
    , params => json_object(
                  'tenant' value '7d58a*****c60a0'
                  , 'team' value '19%3a94d8*****d68aa%40thread.tacv2'
                  , 'channel' value '19%3a94d8*****d68aa%40thread.tacv2'
                  , 'title' value 'daily_sales_report'
                  , 'type' value 'csv'
                )
  );
end;
/
If successful, you should see the CSV document link in teams.

And when you click on the link, it should open the file in Microsoft Excel (Excel).
Notable Issues
Version
If you need to make changes your Teams app after it has been approved and published by the Teams administrator, you must do the following:
- Increment the version number in the app's basic information page and save it.
- Submit the updated app for approval.
- Have the Teams administrator repeat the approval process only. There should not be a need to add the app to the team again.
Error Messages
If you have worked with an Oracle Database for a while, then it wouldn't surprise you that the error messages from the database sometimes do not represent the underlying issue well. ;-)
ORA-20010: Missing credential name
I came across this error in two difference scenarios. They are for when I attempted to:
- Send a message when the Teams app was not published successfully.
- Send a message when the Teams app was not added to the channel's team.
- Send data to a channel other than the team's General channel.
It appears this error is returned whenever there is an error making a REST call to the Microsoft Graph API.
The first two scenarios were easily resolved. However, I am still unable to send data to a channel, other than the team's General channel.
ORA-20000: Cant Access Team, Check App has enough permission
This one baffled me for a long time when I was trying to send data. In the documentation, it was stated that the value for team should be the teamID component in the team's link. However, the example code showed a value that looks a lot more like the groupid. As it turns out, this isn't a permissions issue, but rather, I had supplied the wrong value for team, and thus the internal ID for the team could not be found when the Microsoft Bot API was queried.
ORA-20000: Cant Access Channel, Check App has enough permission
Similar to the previous error message, you might get this error when an incorrect channel identifier is provided.
Summary
There are countless use cases where developers might want to send notifications or data to users, whether it is through emails or a collaboration platform like Slack and Microsoft Teams. For example, notifying users involved in a business workflow for follow up action, sending daily reports to the C-suites, and more. Again, in Oracle APEX, we already have these capabilities by using either APEX_MAIL to send emails, or APEX_WEB_SERVICE to call webhooks and REST APIs. However, when working in an ADB, this provides yet another convenience method to perform the same task.
With regards to sending messages, I had wondered about why the development team might have chosen to implement the messaging using a bot as oppose to the simpler webhook interface. I found this article that listed this as a comparison between the two approaches:
A notification bot works as a Teams application. You can define your business logic to process data and show data in a customized format.
With the added ability to generate and send data files, I can see why they opted to choose to implement the functionality using a bot. Further, wearing an "admin" hat, I would be more comfortable having a streamlined process for managing access to Teams and the associated resources in Microsoft 365 tenancy.
The team behind the Oracle Autonomous Database product is constantly working on new features to enhance the user/developer experience, and this is one of them! We can only hope that these "dbms_cloud"-type packages find their way quickly to the Oracle Base Database service and on-premise installations.
I hope this article helps you to use this new feature and skip the few pain points that I had experienced getting it going!
