Generate Art Using Latent Diffusion Models and NFC Tags


In my previous post, you read about how I performed fine-tuning and deployed a large language model (LLM) on the Oracle Cloud Infrastructure (OCI) Data Science service. Here, I was hoping to do the same with the Stable Diffusion XL, a Latent Diffusion Model (LDM), but unfortunately, the platform currently does not support a Hugging Face pipeline using this model. I found an alternative, and you will read about it later in this article.
To demonstrate its utility, I create a simple Oracle APEX application that reads NFC tags using the experimental Web NFC API, and then displays an image generated by the deployed machine learning (ML) model.
I called this toy application "Amiibo Art". The Amiibo was created by Nintendo to bridge games with the real world using toys, figurines, and collectibles that embedded a radio-frequency tag. I wanted this APEX application to interact with the real world, and then generate a collectible. If you missed it, here's the screen recording of the application in action:
Deploying the Model
As mentioned earlier, the OCI Data Science platform did not provide me an easy way to deploy the Stable Diffusion XL model. I found an open-source project called Pinferenia that I could use to deploy a Hugging Face pipeline to perform the text-to-image generation task. The code below can be executed and deployed on an OCI Compute, and a GPU, while not required, is desired.
Setup the Server Environment
The first task involved setting up a new Conda environment with the required dependencies using the YAML file below:
channels:
    - conda-forge
    - pytorch
    - nvidia

dependencies:
    - python=3.9
    - pytorch
    - pytorch-cuda
    - transformers
    - pillow
    - numpy
    - safetensors
    - diffusers
    - accelerate
    - pip
    - pip:
        - invisible_watermark
        - oracle-ads
        - pinferencia
If you are new to Conda, write the YAML contents into a file name amiibo-art.yaml, install the Conda software, and then execute the command:
conda env create -n amiibo-art -f amiibo-art.yaml
Then, as instructed, activate the environment before running the subsequent code and commands. To activate the newly created environment, execute the command:
conda activate amiibo-art
Write the Server-Side Code
Create the Python file app.py with the code provided below. Follow the embedded comments to understand what it is doing.
from diffusers import DiffusionPipeline
from pinferencia import Server
import torch
import datetime
import os
import oci.object_storage

def get_current_timestamp():
    """
    Return a timestamp for file naming purposes.
    """
    now = datetime.datetime.now()
    return now.strftime('%Y%m%d%H%M%S')

def save_object(bucketName, objectName, content):
    """
    Save the generated image in an Object Storage bucket for retrieval later.
    """
    mimeType = "image/png"

    object = client.put_object(
        namespace_name = namespace
        , bucket_name = bucketName
        , object_name = objectName
        , content_type = mimeType
        , put_object_body = content
    )

def generate(prompt):
    """
    This function is registered to the Pinferencia as the model "genai". It
    generates the image using the Hugging Face pipeline, save the output as a
    file, then push it to the Object Storage bucket using the function
    "save_object".
    """
    bucketName = "amiibo"
    objectName = f"image{get_current_timestamp()}.png"
    image = pipe(prompt=prompt, width=1280, height=720).images[0]
    image.save(objectName)
    content = open(objectName, "rb")
    save_object(bucketName=bucketName, objectName=objectName, content=content)
    os.remove(objectName)
    return {"bucket_name": bucketName, "object_name": objectName}

"""
We will use an instance principal to sign the request. Be sure to:
1. Create a dynamic group that includes the Compute instance's OCID.
2. Create an IAM policy that has the necessary statements to allow the dynamic
   group to write to the bucket.
"""
signer = oci.auth.signers.InstancePrincipalsSecurityTokenSigner()
client = oci.object_storage.ObjectStorageClient(config={"region":"***",
    "tenancy":signer.tenancy_id}, signer=signer)
namespace = client.get_namespace().data

"""
Create a Hugging Face pipeline using the Stable Diffusion XL model hosted on the
platform. We will use the quantized model.
"""
pipe = DiffusionPipeline.from_pretrained("stabilityai/stable-diffusion-xl-base-1.0",
        use_safetensors=True, torch_dtype=torch.float16, variant="fp16")

"""
Use a Nvidia GPU, if available.
"""
pipe.to("cuda" if torch.cuda.is_available() else "cpu")

"""
Instantiate the Pinferencia server.
"""
service = Server()

"""
Register the "generate" function as the model "genai".
"""
service.register(model_name="genai", model=generate,
    metadata={"platform":"Linux", "device": "GPU"})
Run the Server
The Pinferencia package includes executables for running a server instance. For simplicity, I ran the server in the background using tmux (think screen), and executing the command:
pinfer --backend-host 0.0.0.0 --mode backend app:service --reload
NOTE
By default, the server only binds and listens to the local interface, i.e.,
localhostor IP address127.0.0.1. Hence, the command includes the parameter--backend-host 0.0.0.0.
The deployed model is accessible at an endpoint URL with a format that looks like this:
http://{{HOST_IP}}:8000/v1/models/{{MODEL_NAME}}/predict
For example:
http://10.30.4.23:8000/v1/models/genai/predict
Deploy an OCI API Gateway
As I am calling this web service from an Oracle Autonomous Database that is not using a private endpoint, I needed to proxy the service over HTTPS. The fastest approach to achieve this was to create an OCI API Gateway and route as show below.
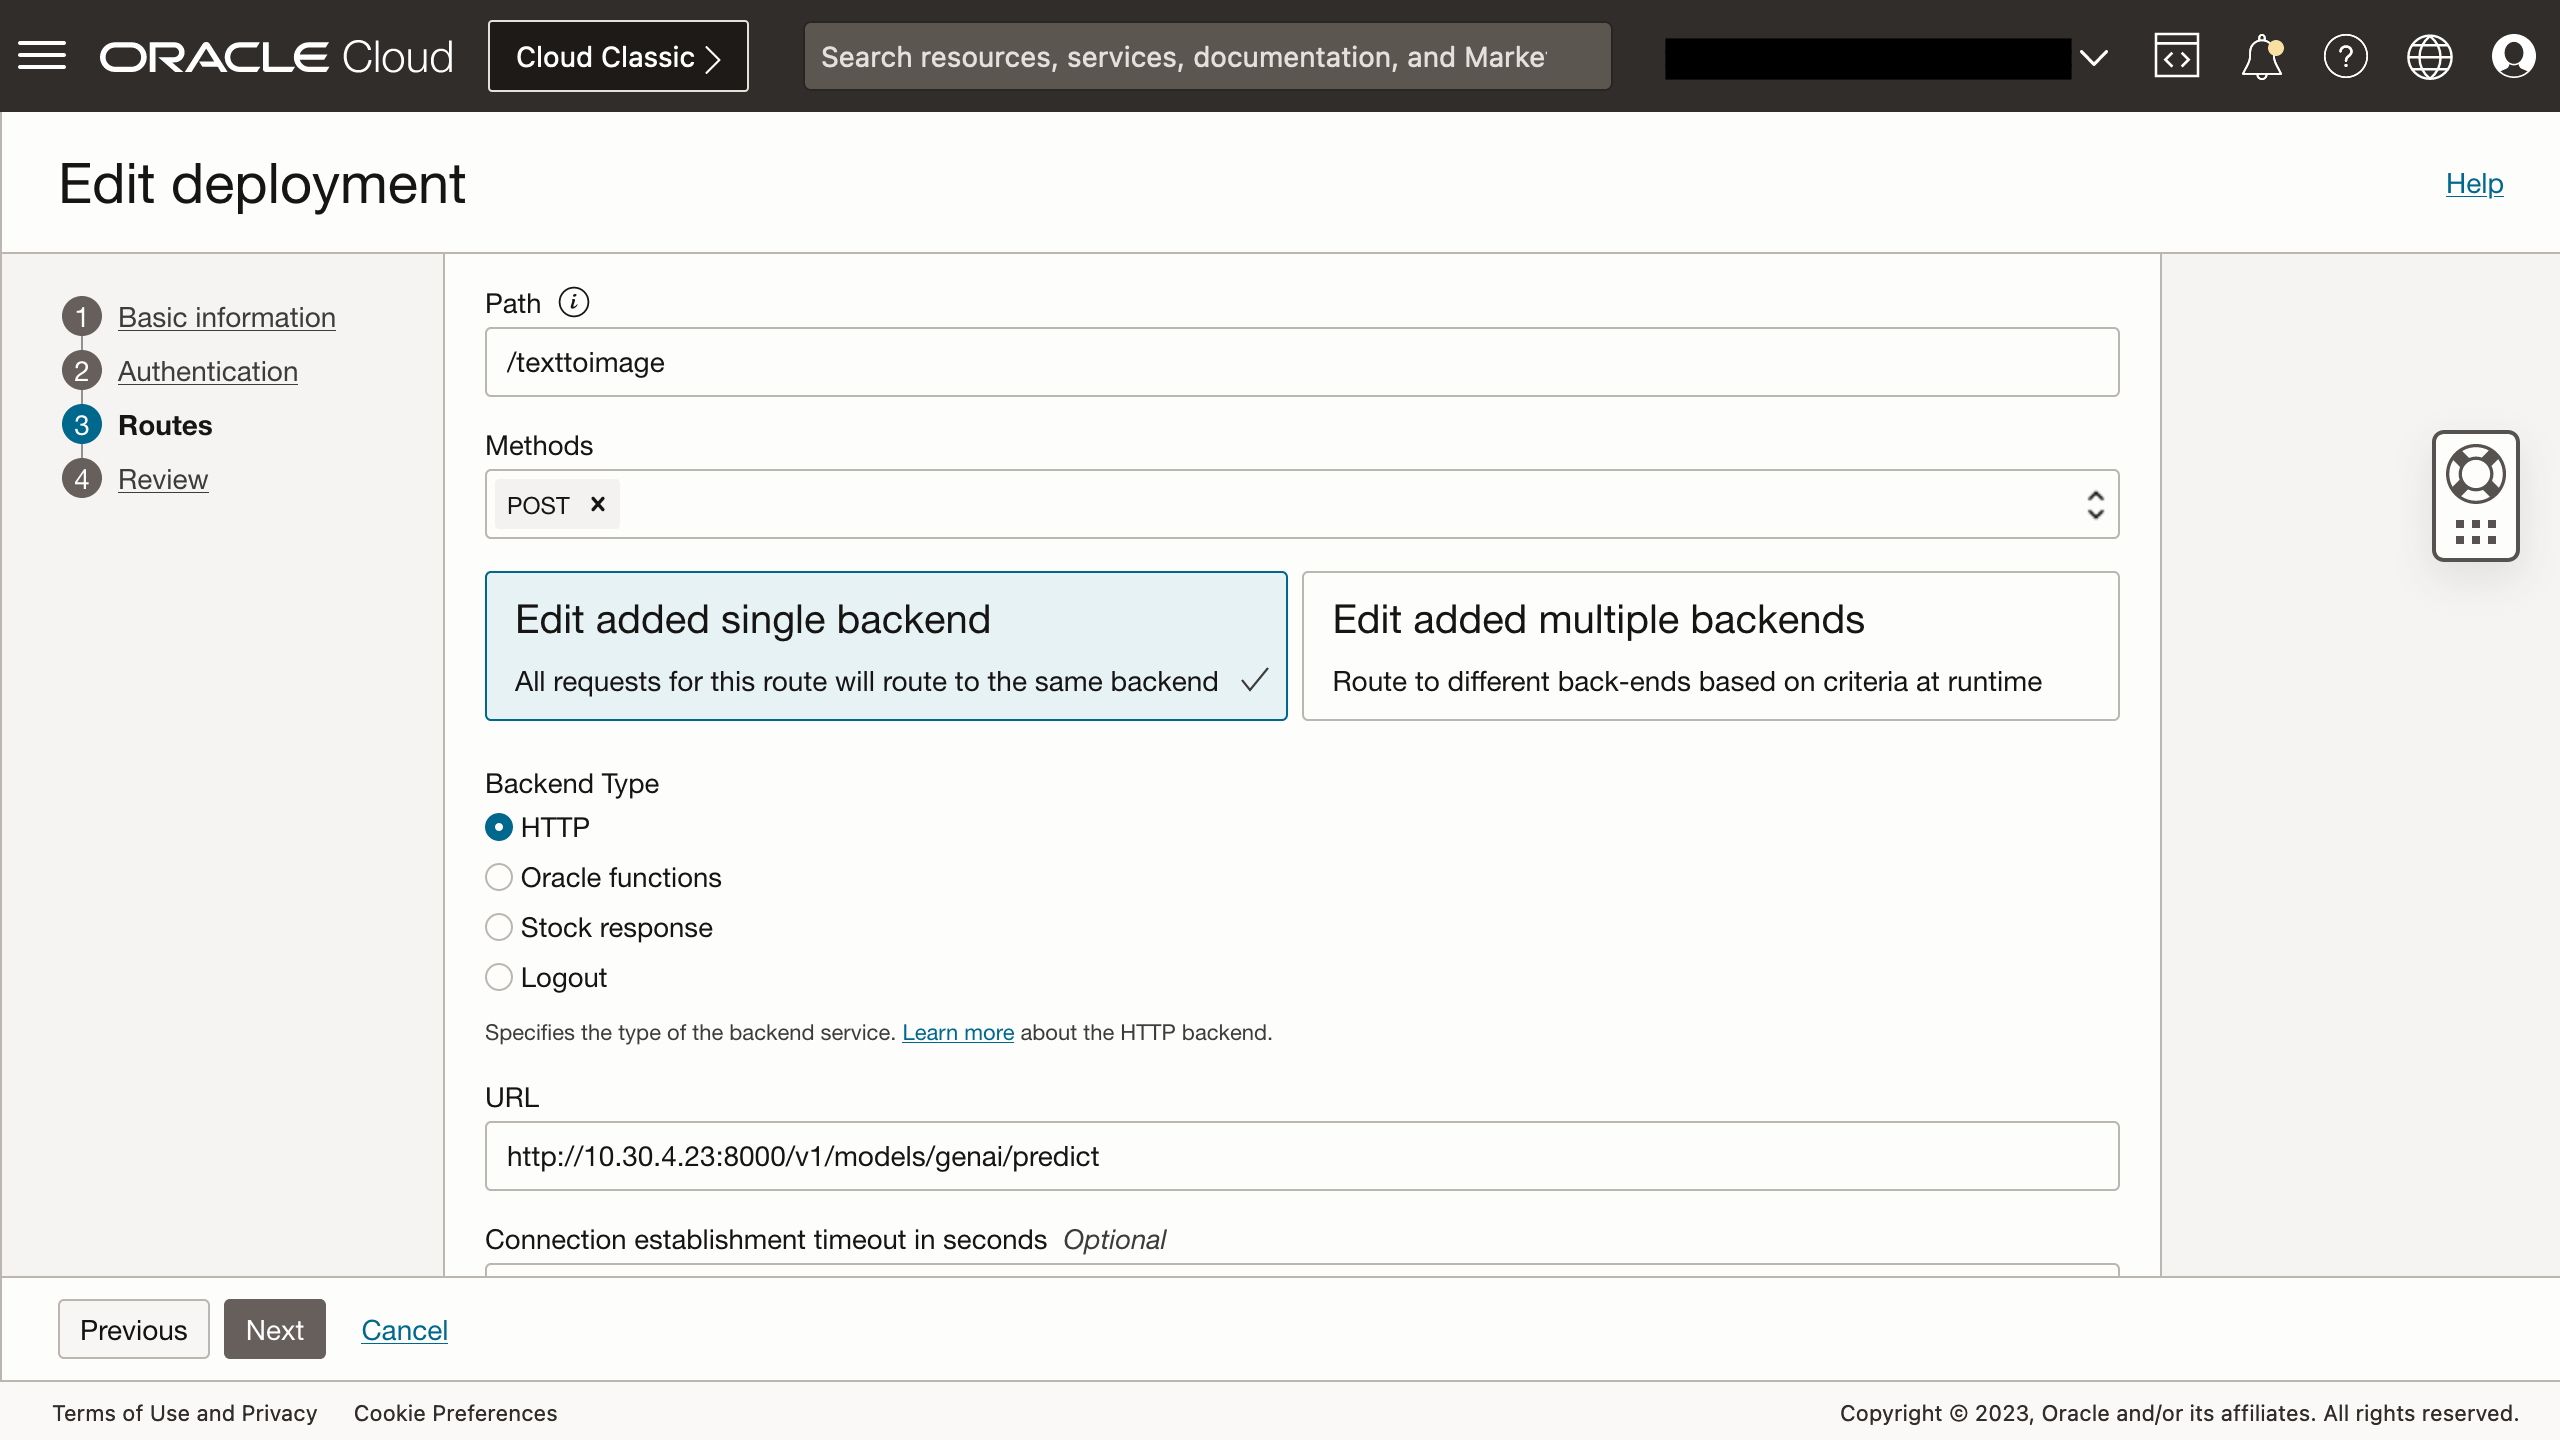
This serves the web service publicly using an endpoint address that looks like this:
https://{{UNIQUE_IDENTIFIER}}.apigateway.eu-frankfurt-1.oci.customer-oci.com/v1/genai/texttoimage
Testing the Model
Pinferencia provides a Swagger UI that documents all the endpoints it is serving. You can use it to try out the models served. In this diagram, I am testing the image generation model.
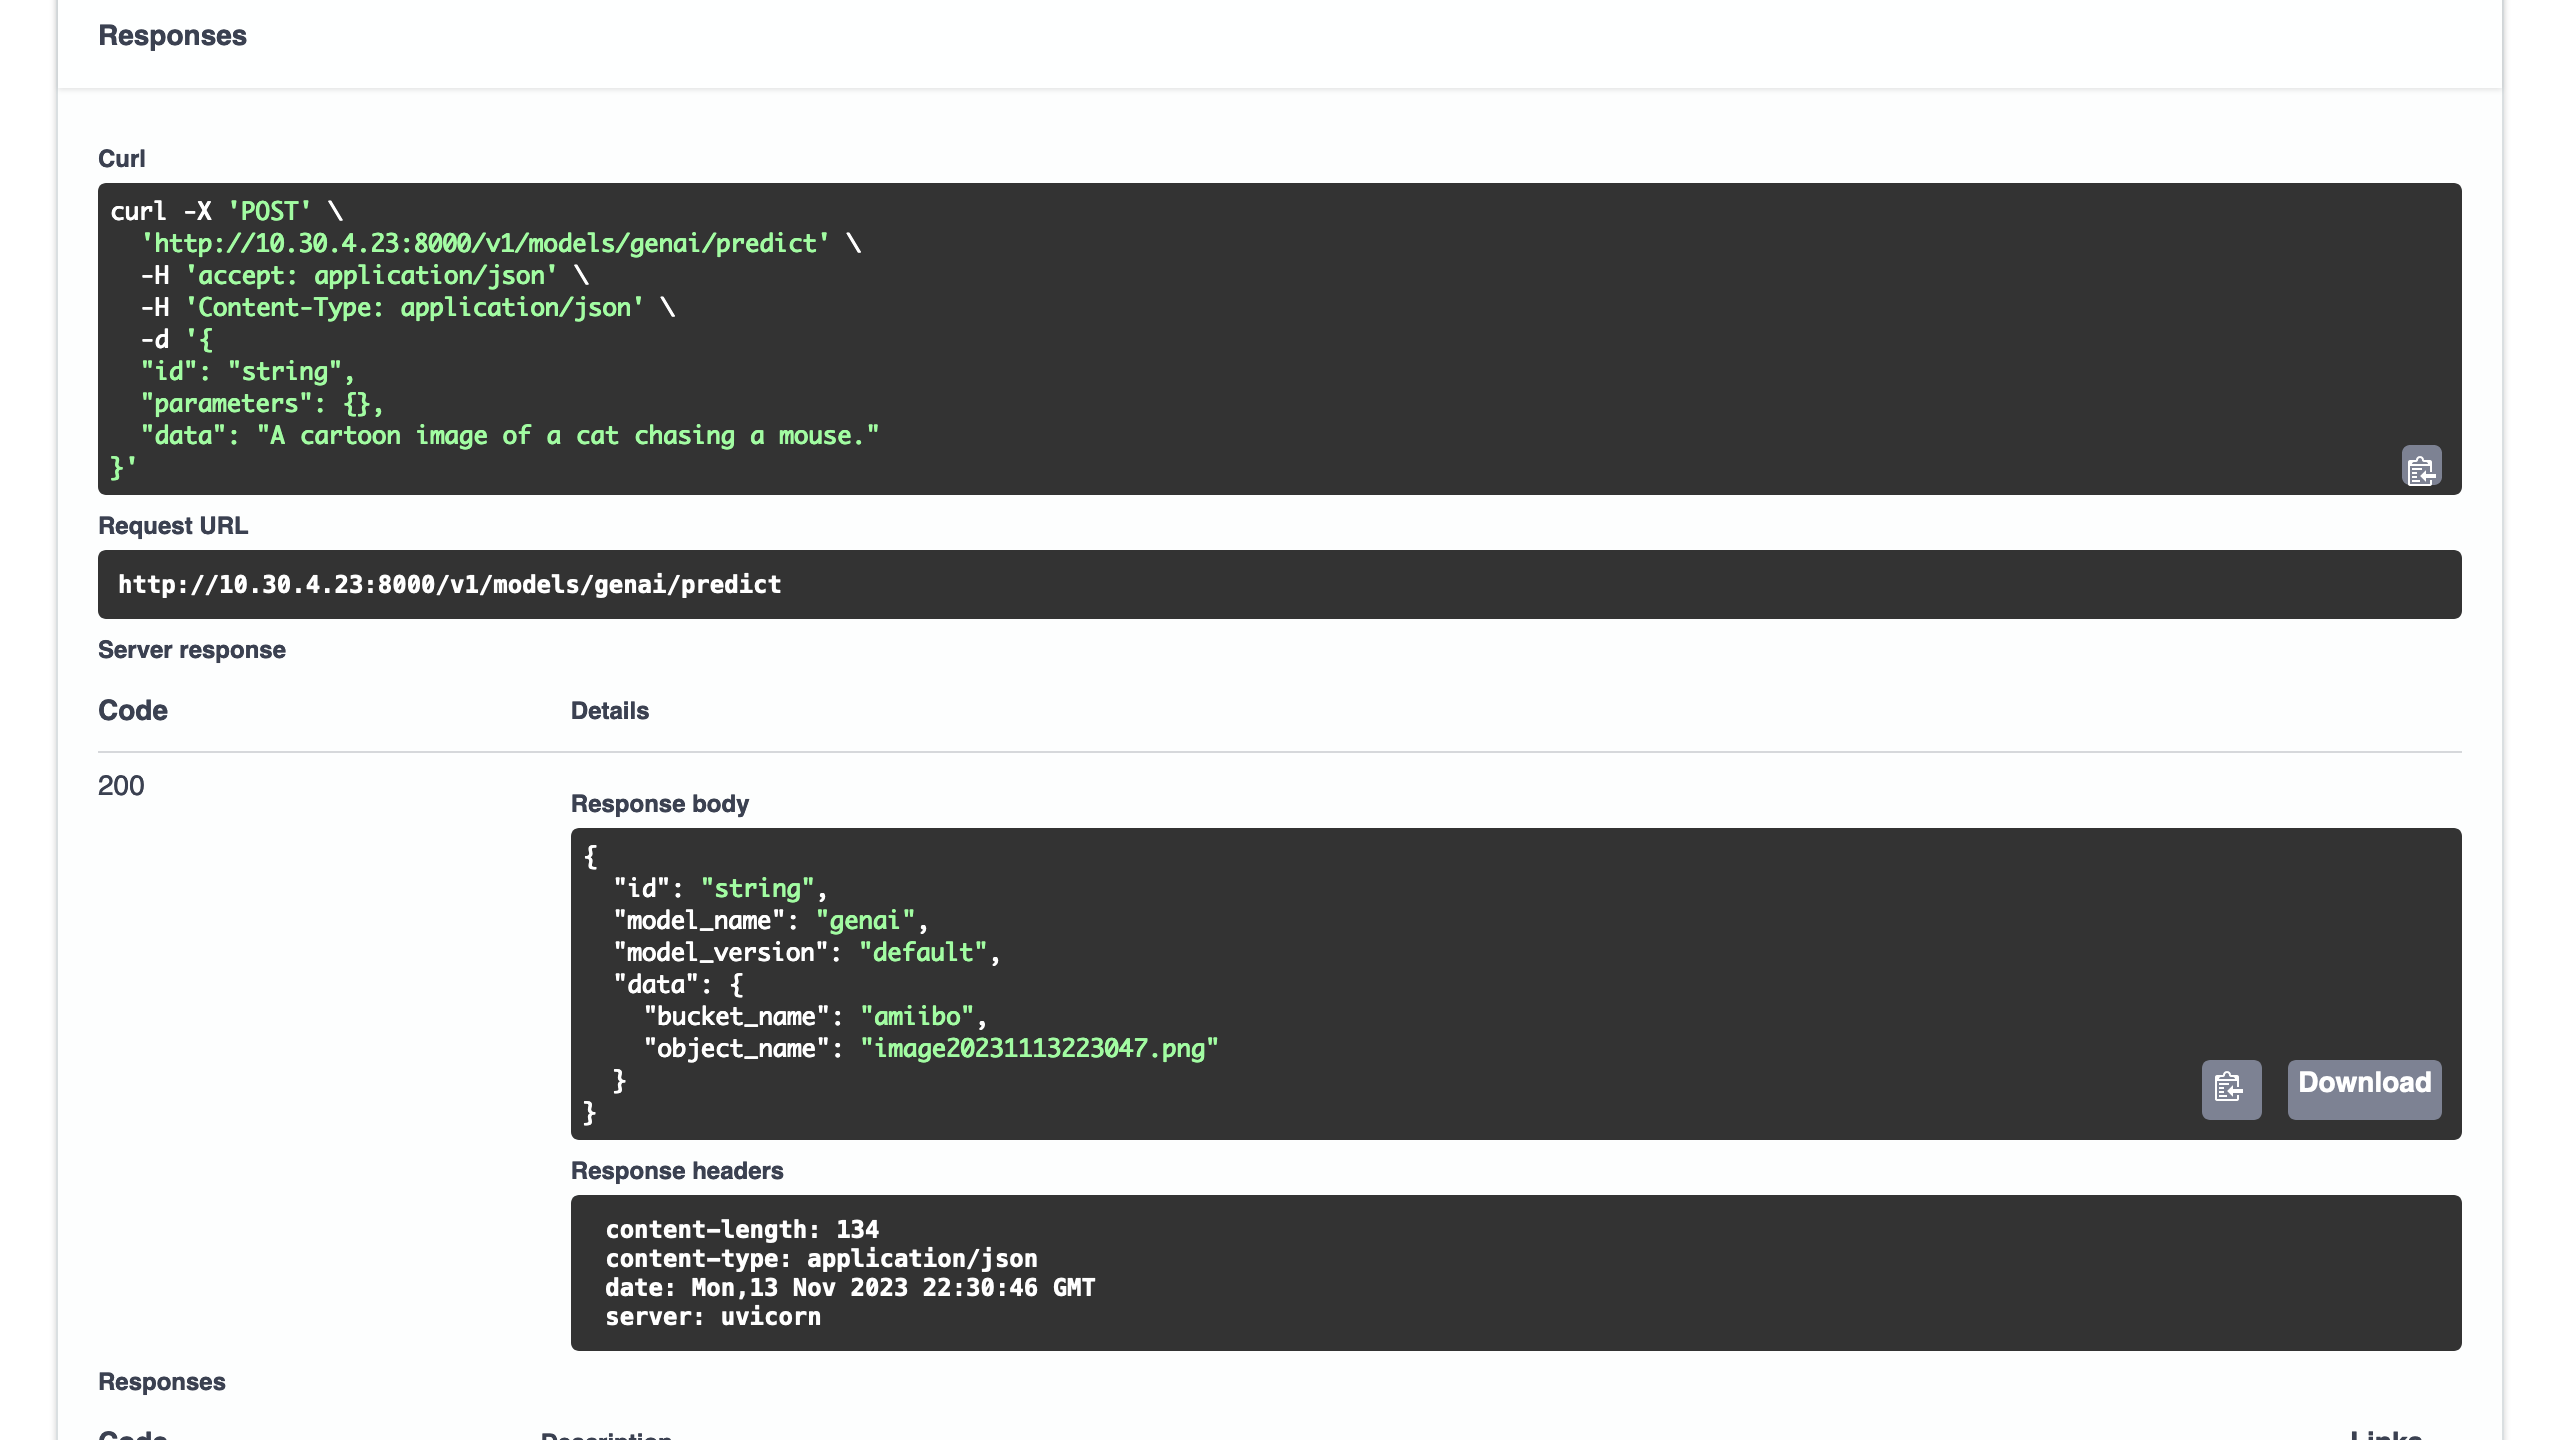
The input is a JSON object containing the prompt:
{
    "id": "string",
    "parameters": {},
    "data": "A cartoon image of a cat chasing a mouse."
}
After the image has been placed in the bucket, it returns a HTTP response containing a JSON payload with the bucket_name and object_name that we can use to retrieve the object.
{
    "id": "string",
    "model_name": "genai",
    "model_version": "default",
    "data": {
        "bucket_name": "amiibo",
        "object_name": "image20231113223047.png"
    }
}
The NFC-Enabled Web Application
I created an Oracle APEX application with the following features:
- Page 1. On the home page, the user scans a NFC tag containing a single text record that stores the prompt to submit to the deployed model.
- An administrative tool that allows an administrator to:
- Page 2. List tags in the inventory with buttons to manage or write prompts to a tag.
- Page 3. Register and manage a tag.
- Page 4. Write prompts to a tag.
To keep this blog post readable, I will focus on two key aspects that allow the user to scan and generate an image.
First, the Ajax Callback process that is called when an NFC tag containing a valid prompt is scanned successfully. Again, follow the embedded comments to understand what this code does.
declare
    /**
     * The collection name used for temporary storing the images.
     */
    c_collection_name apex_collections.collection_name%type := 'AMIIBO_ART';

    /**
     * The JavaScript event listener will read the tag and supply prompt using
     * the x01 variable.
     */
    l_prompt apex_application.g_x01%type := apex_application.g_x01;

    /**
     * Utility variables for reading and parsing the results.
     */
    l_response clob;
    l_content blob;
    l_json_response apex_json.t_values;
begin
    /**
     * Call the deployed model's endpoint through the API gateway. The payload
     * contains the prompt read from the NFC tag.
     */
    l_response := apex_web_service.make_rest_request(
        p_url => 'https://{{UNIQUE_IDENTIFIER}}.apigateway.eu-frankfurt-1.oci.customer-oci.com/v1/genai/texttoimage'
        , p_http_method => 'POST'
        , p_body => json_object(
            key 'data' value l_prompt
        )
    );

    if apex_web_service.g_status_code = 200 then
        /**
         * If all goes well, parse the HTTP response's JSON payload to read the
         * generated image's bucket and object name.
         */
        apex_json.parse(l_json_response, l_response);

        /**
         * Retrieve the object using the DBMS_CLOUD.GET_OBJECT function. Be sure
         * to also create an IAM user, set up the OCI API credentials, and
         * create the necessary policy to allow the IAM user to access the
         * object.
         */
        l_content := dbms_cloud.get_object(
            credential_name => 'MY_API_CREDENTIALS'
            , object_uri => 'https://objectstorage.eu-frankfurt-1.oraclecloud.com/n/***/b/amiibo/o/'
                ||  apex_json.get_varchar2(
                        p_path => 'data.object_name'
                        , p_values => l_json_response
                    )
        );

        /**
         * Not the best code here, but I am simply pushing the image into the
         * an APEX collection.
         */
        apex_collection.create_or_truncate_collection(c_collection_name);
        apex_collection.add_member(
            p_collection_name => c_collection_name
            , p_c001 => l_prompt
            , p_blob001 => l_content
        );

        sys.htp.p('{"message":"success", "prompt": "'||l_prompt||'"}');
    else
        sys.htp.p('{"message":"failed"}');
    end if;
end;
This can be a long running process, and better strategies should be considered if larger images, the non-quantized model is used, or the pipeline is not running on a server with a GPU with sufficient memory. With a single Nvidia A10, I was able to get images to be generated in less than 20 seconds. While possible, using a CPU took more than 12 minutes in one attempt I made.
On page 1, an Oracle APEX Card Region is added to render the image using the source query:
select
    seq_id
    , 'My Amiibo Art' as title
    , c001 as prompt
    , blob001 as content_blob
from apex_collections
where collection_name = 'AMIIBO_ART'
And a button that calls a dynamic action that executes the following JavaScript code:
apex.message.alert(
    "Close this alert, and then scan your Amiibo.",
    null,
    { style: "information" }
);

try {
    /**
     * Instantiate the NFC reader object when the scan button is clicked.
     */
    const ndef = new NDEFReader();

    /**
     * Begin scanning.
     */
    ndef.scan();

    /**
     * Attach an event handler when there is an error reading the tag.
     */
    ndef.addEventListener(
        "readingerror",
        () => {
            apex.message.alert(
                "Failed to read data from the Amiibo. Please try again.",
                null,
                { style: "warning" }
            );
        }
    );

    /**
     * Attach an event handler to handle the incoming data when a tag is scanned
     * successfully. The data contains the serial number and its message
     * payload.
     */
    ndef.addEventListener(
        "reading",
        ({ message, serialNumber }) => {
            if(message.records.length > 0) {
                /**
                 * Get the first record.
                 */
                record = message.records[0];

                /**
                 * If it is of the expected record type, then process it.
                 */
                if(record.recordType === "text") {
                    /**
                     * First, instantiate a text decoder.
                     */
                    const decoder = new TextDecoder();

                    let spinner = apex.util.showSpinner($("body"));

                    /**
                     * Call the Ajax callback with the text contained in the
                     * tag's message payload.
                     */
                    apex.server.process(
                        "TEXT_TO_IMAGE",
                        {
                            x01: decoder.decode(record.data)
                        },
                        {
                            success: function( data )  {
                                /**
                                 * TODO:
                                 * A page submit here because the Card region
                                 * was not refreshing with the new image. Needs
                                 * improvement.
                                 */
                                apex.page.submit();
                            },
                            error: function( jqXHR, textStatus, errorThrown ) {
                                // handle error
                            }
                        }
                    );
                }
            }
        }
    );
} catch (error) {
    apex.message.alert(`General error: {error}`, null, { style: "warning" });
}
After the tag is scan, on the backend, you can see Pinferencia hard at work, generating images typically under 20 seconds.
And if all goes well, the page should be refreshed with the image generated by the model.
Writing to NFC Tags
At the time of writing, the Web NFC API allows developers to read, write, and set a tag to "read-only" mode. In the application, I had created functionality for an administrator to maintain a collection of NFC tags, and to write prompts to them. On page 4, a button is attached to a dynamic action that runs JavaScript code to write to the tag. A sample of the code is as follows:
try {
    ...

    ndef.addEventListener(
        "reading",
        ({ message, serialNumber }) => {
            if(serialNumber === apex.item("P4_TAG_ID").getValue()) {
                ndef.write(apex.item("P4_PROMPT").getValue());
                apex.message.alert(
                    "Prompt written to tag.",
                    null,
                    {style: "information"}
                );
            } else {
                apex.message.alert(
                    "Failed to write to tag. Tag ID mismatch.",
                    null,
                    {style: "danger"}
                );
            }
        }
    );
} catch (error) {
    apex.message.alert(`General error: {error}`, null, { style: "warning" });
}
Easy eh?
Summary
I worked on this fun project with two objectives in mind:
- How can I work with NFC tags in an Oracle APEX application.
- How can I host a Stable Diffusion model in the OCI.
Despite the limitations, I have learned quite a bit during this adventure.
- Support for NFC tags is currently limited. Only Google Chrome on an Android device supports the experimental Web NFC API. And even so, we seem to be limited to reading, writing, and setting a tag to "read-only" mode. Hopefully, there will be future support password-lock a tag as well.
- Not all Hugging Face pipelines are supported and can be deployed to the OCI Data Science platform.
- There are other software platforms that can be used to deploy ML models, for example, Pinferencia. I don't consider it ready for production use, but it has been very easy to set up, run, and host a ML model.
Hope you enjoyed reading about this as much as I had working and writing on the project. If you are interested to discuss possible solutions to your unique business challenge, please reach out to me using this form.
Credits
- Banner image generated using Stability AI's Stable Diffusion model.