Invoking Oracle Cloud Functions Made Easy

I have a huge passion for the Oracle Autonomous Database (ADB) for many reasons. Besides its comprehensive set of built-in features, and mostly hands-off management, what I really appreciate is the constant introduction of new add-ons that allows us to implement compelling cloud-based solutions for our clients. In this month's release, Oracle announced a new method for invoking serverless functions either hosted on the Oracle Cloud Infrastructure, or Amazon Web Services, as SQL functions.
OCI Functions is Oracle's answer to serverless computing. This cloud native service allows developers to decompose applications to single functions, and implement them using the most suitable or preferred programming language. In Functions, these units of code are deployed as Docker containers on the OCI's managed infrastructure. It is based on the open source Fn Project, and using this toolkit, developers can write solutions in Go, Java, Node.JS, Python, Ruby, or C#.
I did a presentation entitled "Offload Data Processing with Serverless Computing" at Kscope21 that covers this topic in depth, and again at the Oracle Groundbreaker APAC Virtual Tour 2021. The latter presentation was recorded, and is included below for your convenience.
Functions are invoked by either using the Fn command line interface (CLI) tool, OCI CLI, OCI SDKs, or a signed HTTP request to the function's invoke endpoint. For Oracle APEX applications, we can use the APEX_WEB_SERVICE PL/SQL API and the OCI Web Credentials to invoke the function. And if you are on the ADB, you may also use the OCI PL/SQL SDK to do the same. With this month's announcement, if you are on the ADB, there is a third, and in my opinion, more intuitive interface to serverless functions (including AWS Lambda).
A new PL/SQL API and supporting database views are now available to developers to hide some of the intricacies of invoking serverless functions, condensing the process to a simple SQL function call. For example:
select
  json_value(
    json_value(
      sayhello(params => json_object(key 'name' value 'Adrian'))
      , '$.RESPONSE_BODY'
    )
    , '$.message'
  ) as message
from dual;

-- Returns the value: Hello Adrian
Let's look at how we can quickly set up a simple "Helloworld" to get started.
Task 1 - Set Up Prerequisites OCI Resources
NOTE
For the presentation, I had included a Jupyter notebook that contains detailed, step-by-step instructions to set up your OCI and Functions development environment.
To prepare your OCI tenancy for Functions, you will need to create a variety of resources. They are:
- A compartment named DEMO.
- A Virtual Cloud Network (VCN) named VCN-Demo using the wizard with one public and one private subnet.
- Two Identity and Access Management (IAM) Groups named FunctionsDevelopers and DemoAgents.
- A Policy in IAM named Fn-Development-Policy with the following statements:
These statements allows users in the FunctionsDevelopers group to successfully create Functions applications and functions.
Allow group FunctionsDevelopers to manage repos in tenancy
Allow group FunctionsDevelopers to read objectstorage-namespaces in tenancy
Allow group FunctionsDevelopers to use virtual-network-family in compartment DEMO
Allow group FunctionsDevelopers to manage functions-family in compartment DEMO
Allow group FunctionsDevelopers to read metrics in compartment DEMO
Allow group FunctionsDevelopers to use apm-domains in compartment DEMO
Allow service faas to use apm-domains in compartment DEMO - A second Policy in IAM named Fn-Demo-Policy with the following statements:
These statements allow users in the DemoAgents group to list and invoke functions in the compartment DEMO.
allow group DemoAgents to use fn-invocation in compartment DEMO
allow group DemoAgents to inspect functions-family in compartment DEMO - Two IAM Users named fndev and demoagent. The first user will be used for create, deploying, and managing functions, and the second, will be used by the database schema to invoke the functions.
- Add the user fndev to group FunctionsDevelopers, and demoagent to DemoAgents.
- Generate API Keys for both users using the OCI console. Download both the API private and public keys. Copy the generated configuration templates and store them. You will need them later to configure the Functions development environment and the ADB credentials. Specifically, you will need:
- Tenancy OCID
- User OCID
- Fingerprint; and
- Private key
- Generate an Auth Token for user fndev. This is needed to login to the Oracle Cloud Infrastructure Registry (OCIR) is a Docker/container registry hosted and managed in your OCI tenancy.
- If you haven't already done so, provision an ADB, and then create a schema named DEMO for this tutorial.
Task 2 - Set Up Development Environment
There are three options for developing with OCI Functions, you may create functions using:
- Cloud Shell
- A local machine
- An OCI compute instance (using instance principal)
The easiest, fastest, and cheapest option to get started is to use Cloud Shell.
Upon initializing your Cloud Shell environment, a context would have already been created for you, and it will be named based on the current selected region, e.g., us-phoenix-1. Running the fn ls context should return the following output:
myusername@cloudshell:~ (us-phoenix-1)$ fn ls context
CURRENT NAME            PROVIDER        API URL                                                 REGISTRY
        default         oracle-cs
*       us-phoenix-1    oracle-cs       https://functions.us-phoenix-1.oci.oraclecloud.com
The * indicates the currently selected context for working with Functions. If that hasn't already been selected, then run the command:
fn use context $OCI_REGION
This context configuration will be missing required attributes, and they are:
- The compartment where the functions will be deployed in.
- The OCIR repository address where the Docker or container images for your functions will be deployed to.
To configure these attributes in the Cloud Shell environment, first, set the required environment variables:
REPO_NAME=myrepo
COMPARTMENT_OCID=ocid1.compartment.oc1.....
IMAGES_COMPARTMENT_OCID=${OCI_TENANCY}  # Alternatively, you may specify the compartment OCID.
NAMESPACE=$(echo $(oci os ns get) | jq -r '.data') # Example value returned: mynamespace
REGION_KEY=$(echo $(oci iam region list) | jq -r --arg region_name "${OCI_REGION}" '.data[] | select(.name == $region_name) .key | ascii_downcase')
OCIR_REPO_ADDRESS=${REGION_KEY}.ocir.io/${NAMESPACE}/${REPO_NAME}
And then update the context with these values using the command below:
fn update context registry ${OCIR_REPO_ADDRESS} && \
fn update context oracle.image-compartment-id ${IMAGES_COMPARTMENT_OCID} && \
fn update context oracle.compartment-id ${COMPARTMENT_OCID}
Check that all context attributes are set correctly using the fn inspect context command. Below is an example of the output:
$ fn inspect context
Current context: us-phoenix-1

api-url: https://functions.us-phoenix-1.oci.oraclecloud.com
oracle.compartment-id: ocid1.compartment.oc1.....
oracle.image-compartment-id: ocid1.tenancy.oc1.....
provider: oracle-cs
registry: phx.ocir.io/mynamespace/myrepo
Next, you will need to login to the OCIR using the IAM user, e.g., fndev, using the auth token, and not its password. Begin by setting the IAM_USERNAME environment variable:
IAM_USERNAME=my_iam_username
Then, read the auth token from the command line:
read -s AUTH_TOKEN
Finally, login to the OCIR using the command below:
docker login -u '${NAMESPACE}/${IAM_USERNAME}' ${REGION_KEY}.ocir.io
Task 3 - Prepare Autonomous Database Schema
To allow a database schema to create a catalog and user-defined functions for Functions, the target schema must be granted the minimum privileges. Execute the following grant statements as the ADB's ADMIN user:
define schema = demo
grant execute on dbms_cloud_function to &schema;
grant execute on dbms_cloud_oci_fnc_functions_invoke to &schema;
grant execute on dbms_cloud_oci_fnc_functions_invoke_invoke_function_response_t to &schema;
grant execute on dbms_cloud to &schema;
grant read on user_cloud_function to &schema;
grant read on user_cloud_function_catalog to &schema;
Task 4 - Create the OCI Function
NOTE
A second Jupyter notebook from my presentation guides you through Functions development and deployment, and might be a useful resource if you get stuck here.
In this task, we will work within Cloud Shell to:
- Create the Functions application.
- Generate the boilerplate code for a Python runtime, which is out-of-the-box, a working "Helloworld" function.
- Deploy the function; and then
- Invoke the function using the Fn CLI.
The Functions application must be assigned a subnet to deploy to. Typically, I put applications in a private subnet. Set the environment variables for the subnet's OCID, Functions application, and function names:
SUBNET_OCID=ocid1.subnet.oc1.phx....
APP_NAME=cloudfunc
FN_NAME=sayhello
Next, create the Functions application using the command:
fn create app $APP_NAME \\n--annotation "oracle.com/oci/subnetIds=[\"$SUBNET_OCID\"]"
Then, create the boilerplate code for functions that uses the Python runtime:
fn init --runtime python $FN_NAME
This should create a new directory named after the function, with the following files:
func.pyfunc.yamlrequirements.txt
The func.py contains functional Python to print the desired "Helloworld" output.
import io
import json
import logging

from fdk import response


def handler(ctx, data: io.BytesIO = None):
    name = "World"
    try:
        body = json.loads(data.getvalue())
        name = body.get("name")
    except (Exception, ValueError) as ex:
        logging.getLogger().info('error parsing json payload: ' + str(ex))

    logging.getLogger().info("Inside Python Hello World function")
    return response.Response(
        ctx, response_data=json.dumps(
            {"message": "Hello {0}".format(name)}),
        headers={"Content-Type": "application/json"}
    )
You may modify the code later, but for the purpose of this tutorial, simply deploy the function:
fn deploy --app $APP_NAME --no-bump # The no-bump argument prevents the Fn CLI from incrementing the version number.
The deployment process will build a container image in the Cloud Shell environment, deploy the container image, and create the function. To test that the deployment was successful, invoke the function using the FN CLI:
echo "{\"name\":\"Adrian\"}" | fn invoke $APP_NAME $FN_NAME
The command sends the JSON {"name":"Adrian} in the request body, and should yield the following JSON output:
{"message": "Hello Adrian"}
Task 5 - Create the SQL Function
After successfully deploying the function, login to the database schema for your application, i.e., DEMO, using your favourite database tool. Define the following variables:
define credential_name = 'DEMO_CRED'
define catalog_name = 'DEMO_CATALOG'
define region_id = 'us-phoenix-1'
define compartment_ocid = 'ocid1.compartment.oc1.....'
Tweak the values as required. Then, create the cloud credentials for the IAM user, demoagent. In the PL/SQL procedure below, replace the l_private_key variable with the private key you had generated earlier in Task 1, and then execute the code:
declare
  l_private_key varchar2(32767) := q'[
-----BEGIN PRIVATE KEY-----
MIIEvgIBADANBgkqhkiG9w0BAQEFAASCBKgwggSkAgEAAoIBAQCzgZ/NK88mbeSD
...
BtQ5XBc67Rlf46C/Vw8fxMPb
-----END PRIVATE KEY-----
  ]';
begin
  dbms_cloud.create_credential(
    credential_name => '&credential_name'
    , user_ocid => 'ocid1.user.oc1.....'
    , tenancy_ocid => 'ocid1.tenancy.oc1.....'
    , private_key => trim(l_private_key)
    , fingerprint => '10:...:38'
  );
end;
/
NOTE
[Update, 2023-10-12] It appears that the documentation has been updated.
In the documentation, it says to use the signature:dbms_cloud.create_credential (
credential_name => '&credential_name',
username => 'adb_user@example.com',
password => 'password'
);However, it wasn't clear if the password parameter value should be the IAM user's password, or an authentication token. I tried the latter and that didn't work for me. I prefer to use API keys anyways.
Next, create a catalog for the Functions by executing the following PL/SQL procedure:
begin
dbms_cloud_function.create_catalog(
credential_name => '&credential_name'
, catalog_name => '&catalog_name'
, service_provider => 'OCI'
, cloud_params =>
json_object(
key 'region_id' value '®ion_id'
, key 'compartment_id' value '&compartment_ocid'
)
);
end;
/
NOTE
When creating catalogs as the ADMIN user, you may use resource principals. The credential name would be
OCI$RESOURCE_PRINCIPAL. If you used resource principals, be sure to include the required IAM policy statements to allow the dynamic group access to list and invoke Functions. I was not able to get resource principals to work with the application schema.
The quickest way to create the PL/SQL wrappers for the deployed functions is to use the DBMS_CLOUD_FUNCTION.SYNC_FUNCTIONS procedure. Execute the following block of code:
begin
  dbms_cloud_function.sync_functions(
    catalog_name => '&catalog_name'
    , refresh_rate => 'DAILY'
  );
end;
/
The default value for the refresh_rate is DAILY. This parameter specifies how often the database synchronizes with the Functions service for any changes to the deployed functions.
You may now query the USER_CLOUD_FUNCTION view to list all functions that the database has discovered and created wrappers for:
select * from user_cloud_function;
Verify that you now have access to the SQL function by querying the USER_OBJECTS view. For example:
select *
from user_objects
where 1 = 1
  and object_type = 'FUNCTION'
  and object_name = 'SAYHELLO';
Task 6 - Invoke the OCI Function Using Its SQL Function
In this final task, create a SUBSCRIBER table containing two columns, FIRST_NAME and LAST_NAME, by executing the following SQL statement:
create table subscriber (
	subscriber_id number generated always as identity
	, first_name varchar2(200) not null
	, last_name varchar2(200) not null
	, constraint subscriber_pk primary key (subscriber_id)
)
/
Next, insert a few random names to the SUBSCRIBER table:
insert into subscriber (first_name, last_name) values ('Alice', 'Smith');
insert into subscriber (first_name, last_name) values ('Bob', 'Jones');
insert into subscriber (first_name, last_name) values ('Charlie', 'Brown');
insert into subscriber (first_name, last_name) values ('David', 'White');
insert into subscriber (first_name, last_name) values ('Emma', 'Green');
insert into subscriber (first_name, last_name) values ('Frank', 'Black');
insert into subscriber (first_name, last_name) values ('George', 'Pink');
insert into subscriber (first_name, last_name) values ('Helen', 'Yellow');
insert into subscriber (first_name, last_name) values ('Ivy', 'Blue');
insert into subscriber (first_name, last_name) values ('Jim', 'Red');
commit;
Then execute a query that generates a greeting message for each subscriber, using their first names:
select
  json_value(
    json_value(
      sayhello(params => json_object(key 'name' value first_name))
      , '$.RESPONSE_BODY'
    )
    , '$.message'
  ) as message
from subscriber;
That's it!
Important Notes
In Functions, tenants are billed based on the following factors:
- The number of times a function is invoked.
- The memory over time consumed by function, measured in gigabyte-seconds.
The OCI Blog post covers in detail how these costs are calculated, including a comparison with the costs of executing AWS Lambda functions.
select
  json_value(
    json_value(
      sayhello(params => json_object(key 'name' value first_name))
      , '$.RESPONSE_BODY'
    )
    , '$.message'
  ) as message
from table_with_a_million_subscribers;
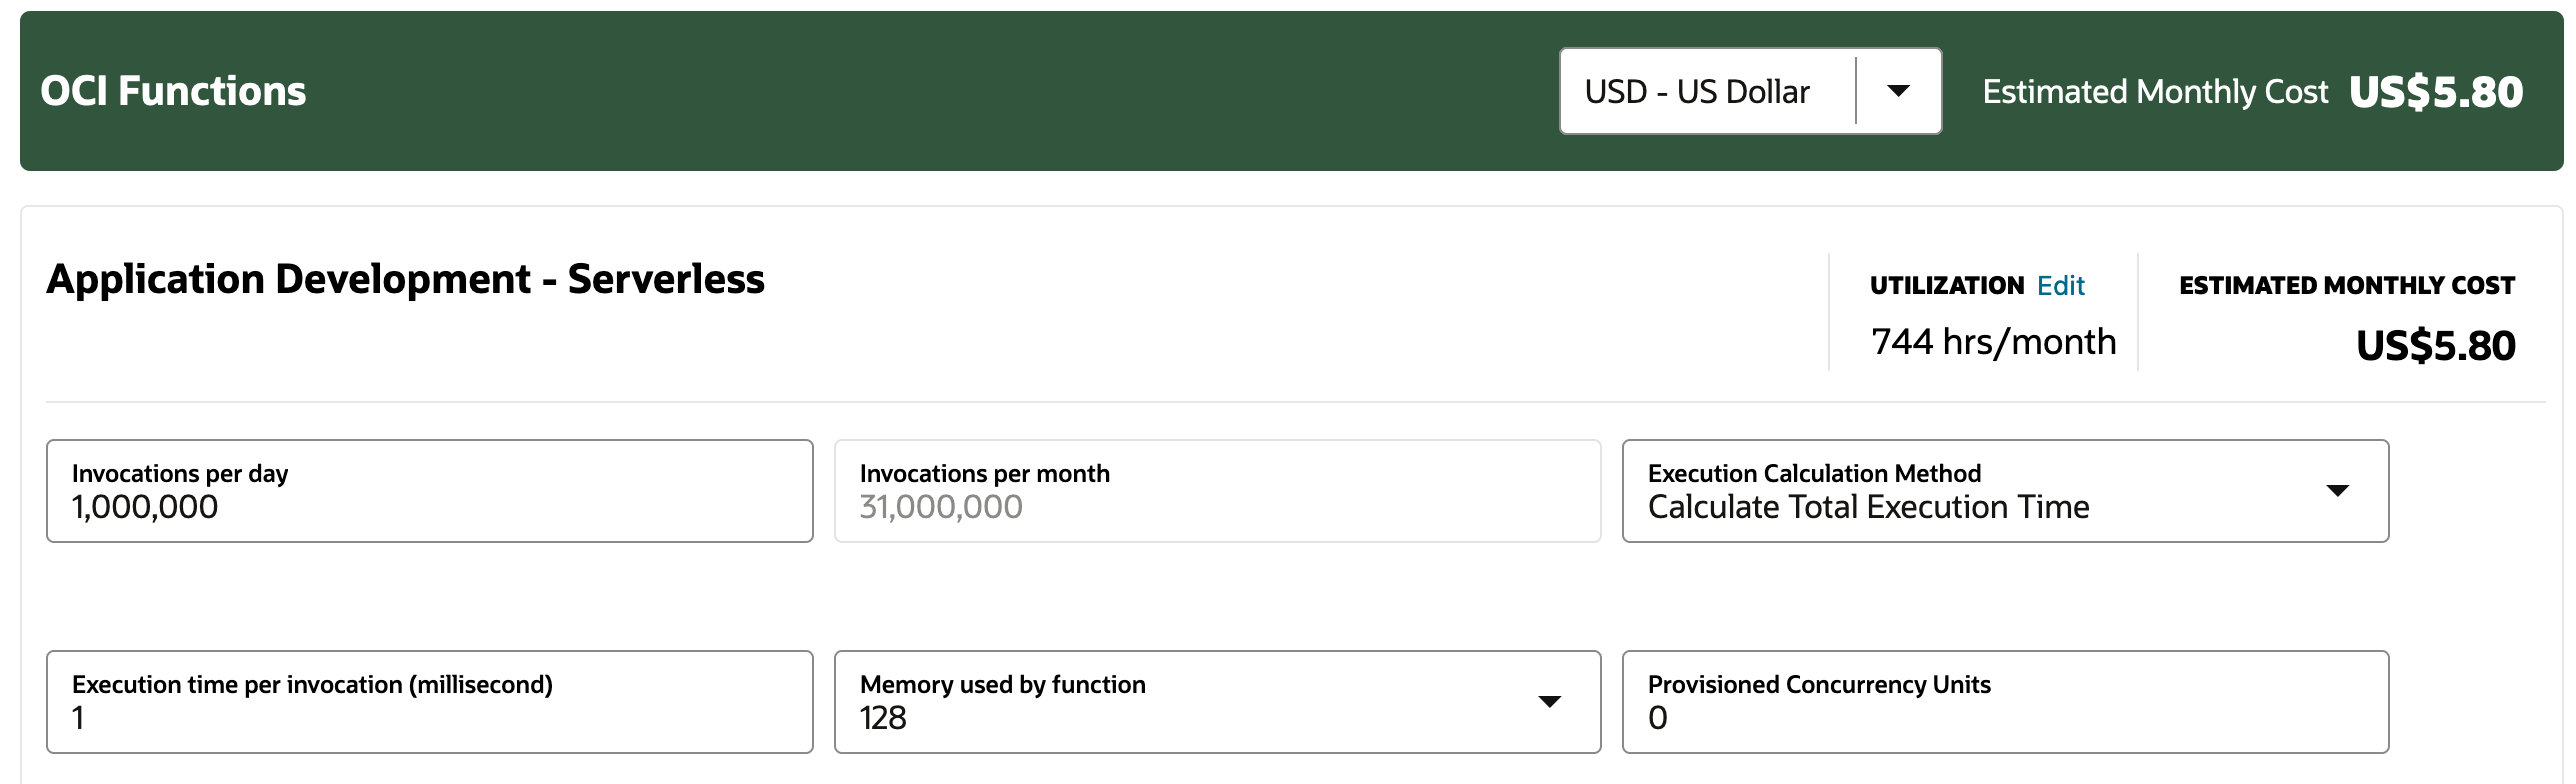
Assuming that the function uses the minimal memory allocation amount of 128 MB, and executes within 1 millisecond, if this simple SQL query statement is executed daily, it would result in the following consumption:
- 31,000,000 invocations
- 31,000,000 x 0.001 s x 0.125 GB
Using the OCI cost estimator, we are looking at a bill of approximately USD 5.80.
It might not seem like a lot, but I hope this gives you an idea of how quickly costs can pile up if you are not careful.
Also, there are rate limits imposed on invoking functions. If you exceed this limit, the service will return an error with HTTP status code 429. Consider batching large numbers of function calls, and a timeout to avoid flooding the service with requests.
In summary, put thought into how to use this powerful new functionality. I also strongly recommend setting up a budget to monitor costs to keep a lid on runaway API calls, including those belonging to the Oracle AI suite of services, and avoid any surprises at the end of the month.